maven中profiles使用详解,多环境开发配置文件(开发,测试,生产)+ pom中resources部分标签介绍
一.maven中profiles使用详解(仅供参考)
使用的场景
常常遇到一些项目中多环境切换的问题。比如在开发过程中用到开发环境,在测试中使用测试环境,在生产中用生产环境的情况。springboot中提供了 spring.profile.active的方式来实现多环境的切换,通过设置环境变量和启动参数的方式。但是这样做终究不能一劳永逸,要么需要修改yml文件,要么需要记得启动的时候带上参数。
而利用maven的profiles,可以减少很多工作。
1.pom.xml中添加
需要在pom.xml中添加以下配置xml配置
<profiles> <!--步骤一:多环境配置,根据不同的环境将对应的环境变量设置到项目中--> <profile> <!-- 本地开发环境 --> <!--不同环境Profile的唯一id--> <id>dev</id> <properties> <profiles.active>dev</profiles.active> </properties> <!--配置默认的,配置文件,右侧的maven中,profiles默认选中dev--> <activation> <activeByDefault>true</activeByDefault> </activation> </profile> <profile> <!-- 联调环境 --> <id>init</id> <properties> <profiles.active>init</profiles.active> </properties> </profile> <profile> <!-- 灰度环境 --> <id>gray</id> <properties> <profiles.active>gray</profiles.active> </properties> </profile> </profiles>2.设置配置文件
在目录中建立如下项目结构。
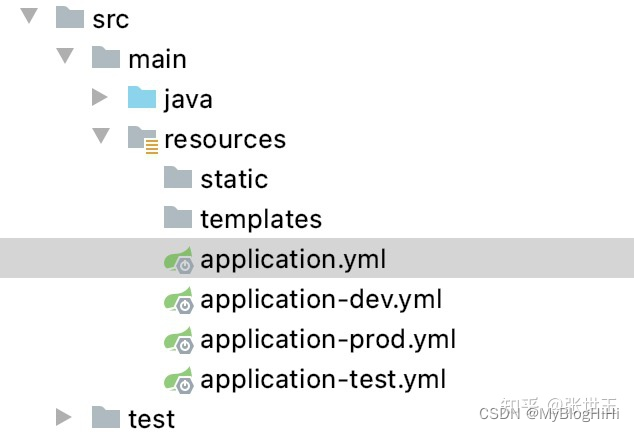
或者
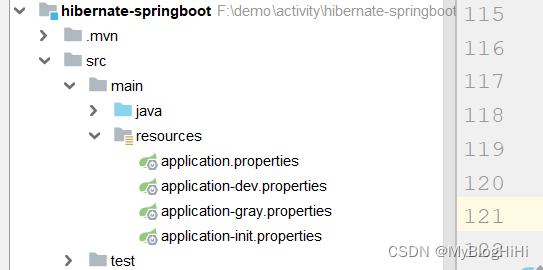
2.1.application.yml中代码如下
#多环境配置开发时使用-不放开则使用application.propertiesspring.profiles.active=@profiles.active@spring: profiles: active: @profiles.active@2.2.application-dev.yml中代码如下
server: port: 7091其他几个文件我只是把端口号进行了修改,方便打包看不同的效果(按需要,实际开发修改即可)。
2.3.maven打包与激活profiles
你可以执行命令
mvn clean package -Ptest可以查看jar包中的配置文件变化,然后启动jar包,可以看到jar包启动的是test的配置,如果换成-Pdev启动的就是dev包的端口。
默认启动方式
如果不带-Ptest,启动的是 prod的端口。因为在profiles中我们看到有配置默认的选项。
<profile> <!-- 本地开发环境 --> <id>prod</id> <properties> <profiles.active>prod</profiles.active> </properties> <!--配置默认的,配置文件,idea开发右侧的maven中,profiles默认选中prod--> <activation> <activeByDefault>true</activeByDefault> </activation> </profile>settings.xml中使用activeProfiles指定
<activeProfiles> <activeProfile>profileTest1</activeProfile> </activeProfiles>通过IDEA的可视化的方式
当然如果使用IDEA工具进行开发,还可以使用可视化的方式进行打包。
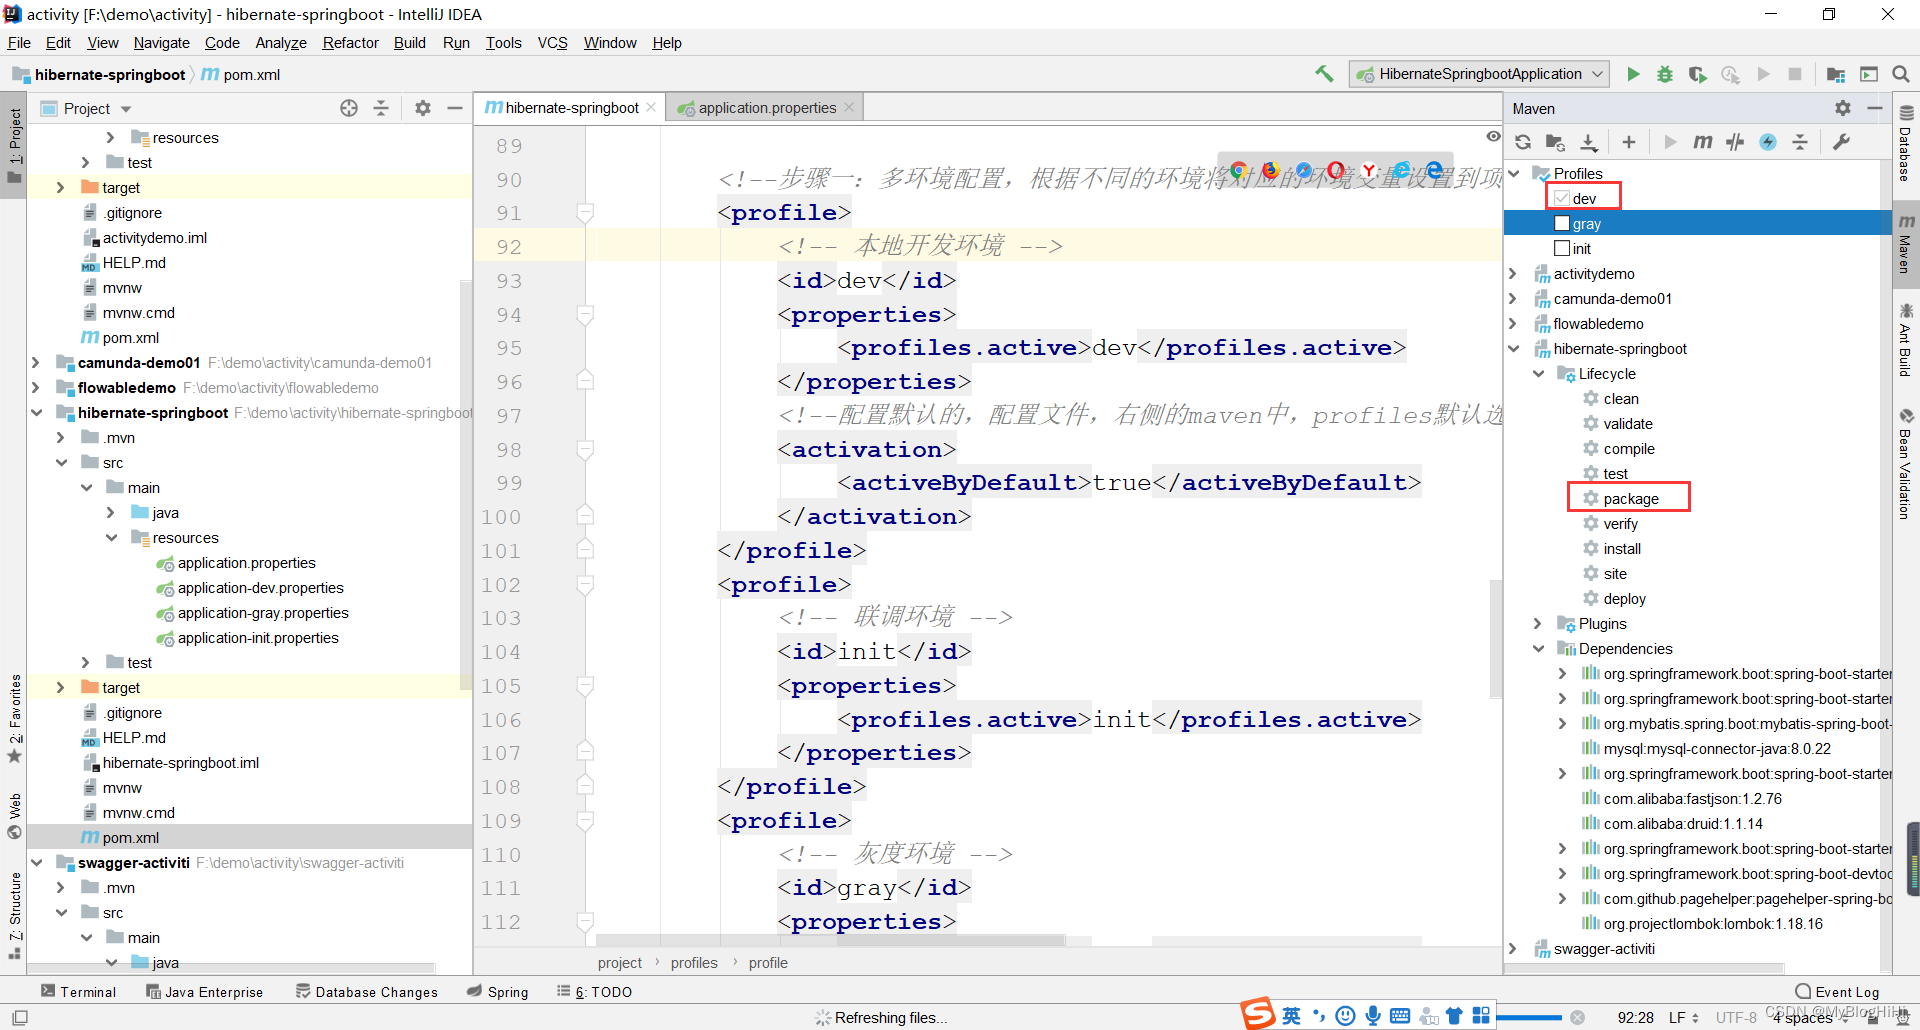
二.更高级的玩法
通过和pom结合的方式设置动态参数
如果我们希望通过docker-maven-plugin插件,把编译好的jar打包成docker并且传入相应的开发、测试、生产的服务器中去。这个时候,我们就需要根据不同的条件去传入不同的服务器。
在profiles中我们可以做以下定义
<profiles> <profile> <id>dev</id> <properties> <profile.id>dev</profile.id> <docker.host>http://dev.demo.com:2375</docker.host> </properties> <activation> <activeByDefault>true</activeByDefault> </activation> </profile> <profile> <id>test</id> <properties> <profile.id>test</profile.id> <docker.host>http://test.demo.com375</docker.host> </properties> </profile> <profile> <id>prod</id> <properties> <profile.id>prod</profile.id> <docker.host>http://prod.demo.com:2375</docker.host> </properties> </profile> </profiles>而在build控件中我们可以使用以下配置
<build> <plugins> <plugin> <groupId>com.spotify</groupId> <artifactId>docker-maven-plugin</artifactId> <version>1.1.0</version> <executions> <execution> <id>build-image</id> <phase>package</phase> <goals><goal>build</goal> </goals> </execution> </executions> <configuration> <imageName>demo/${project.artifactId}</imageName> <imageTags> <imageTag>${project.version}-${current.time}</imageTag> <imageTag>latest</imageTag> </imageTags> <forceTags>true</forceTags> <dockerHost>${docker.host}</dockerHost> <forceTags>true</forceTags> <baseImage>java:8</baseImage> <entryPoint>["java", "-jar", "/${project.build.finalName}.jar"]</entryPoint> <resources> <resource><targetPath>/</targetPath><directory>${project.build.directory}</directory><include>${project.build.finalName}.jar</include> </resource> </resources> </configuration> </plugin> </plugins></build>其中 ${project.artifactId} 和${project.version}是关于节点下面和的引用。${current.time}是在build-helper-maven-plugin定义的。
${docker.host}则是我们在profiles中定义的,可以随着我们选择不同的profile,把jar包build成不同的docker镜像,并传入指定服务器。
通过和yml结合设置动态参数
除了可以在pom中设置动态参数,使得其根据profile的不同选择不同的参数。还可以通过设置不同的profile,让yml选择不同的参数。这点和快速上手的例子有点相似。具体如下:
设置profiles
<profiles> <profile> <id>dev</id> <properties> <profile.id>dev</profile.id> <eureka.url>http://127.0.0.1:8001/eureka</eureka.url> </properties> <activation> <activeByDefault>true</activeByDefault> </activation> </profile> <profile> <id>test</id> <properties> <profile.id>test</profile.id> <eureka.url>http://base-registry:8001/eureka</eureka.url> </properties> </profile> <profile> <id>prod</id> <properties> <profile.id>prod</profile.id> <eureka.url>http://base-registry:8001/eureka</eureka.url> </properties> </profile> <profile> <id>new</id> <properties> <profile.id>new</profile.id> <eureka.url>http://base-registry:8001/eureka</eureka.url> </properties> </profile> </profiles>我们在profile中设置了一个eureka.url的属性,就可以在yml中直接调用。
eureka: client: service-url: defaultZone: @eureka.url@ registry-fetch-interval-seconds: 10 instance: prefer-ip-address: true在IDEA调试和启动的时候,一般会报错如下:
org.yaml.snakeyaml.scanner.ScannerException: while scanning for the next tokenfound character ‘@’ that cannot start any token.解决方法就是引入yaml.sankeyaml的jar包
<dependency> <groupId>org.yaml</groupId> <artifactId>snakeyaml</artifactId></dependency>打包不同的资源
在profile打包yml文件的时候,如果我们解压了jar包,会发现还是把所有的application-profile.yml文件给打包进去了。这个可以通过设置打包参数,只打包需要的application文件。
xml dev dev true prd prd
<build> <finalName>springmvc</finalName> <resources> <resource> <!--表示读取该目录的所有文件--> <directory>class="lazy" data-src/main/java</directory> <includes> <include>*.xml</include> </includes> </resource> <resource> <directory>class="lazy" data-src/main/resources</directory> <excludes> <exclude>dev/*</exclude> <exclude>prd/*</exclude> </excludes> </resource> <resource> <directory>class="lazy" data-src/main/resources/${env}</directory> </resource> </resources></build>目录结构如下:
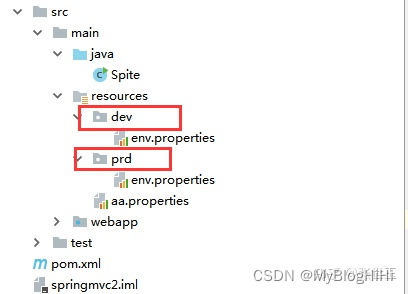
三.标签介绍
resources标签是指定读取的配置文件或文件夹中的文件
resources标签内容需配置在中
1.、最简单的
<resource><directory>class="lazy" data-src/main/resources</directory></resource>表示读取该目录的所有文件
2、filtering
<resource><directory>class="lazy" data-src/main/resources</directory><filtering>true</filtering></resource>filtering是否开启替换标签,若文件中有类似${key}这样的配置,就会根据maven的配置进行覆盖,让其使用真实值来填写
true表示开启替换,false表示不开启替换,无此标签表示不开启替换
真实值是从pom中profiles的配置里面取的
3、targetPath
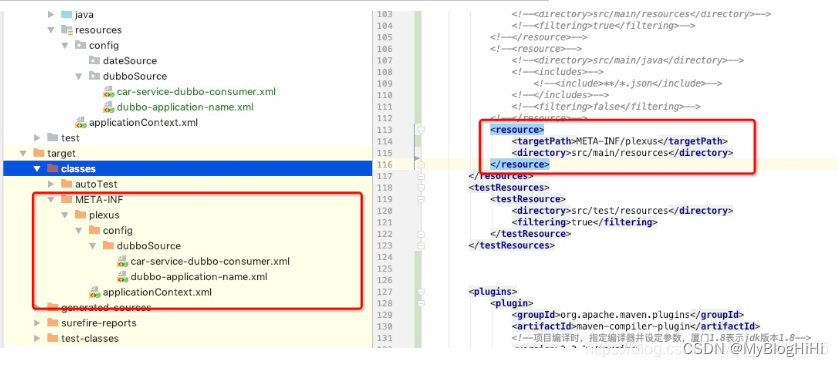
<resource><targetPath>META-INF/plexus</targetPath><directory>class="lazy" data-src/main/resources</directory></resource>targetPath用于指定读取资源到target的那个目录下,如下图,不指定默认为target/classes
4、includes
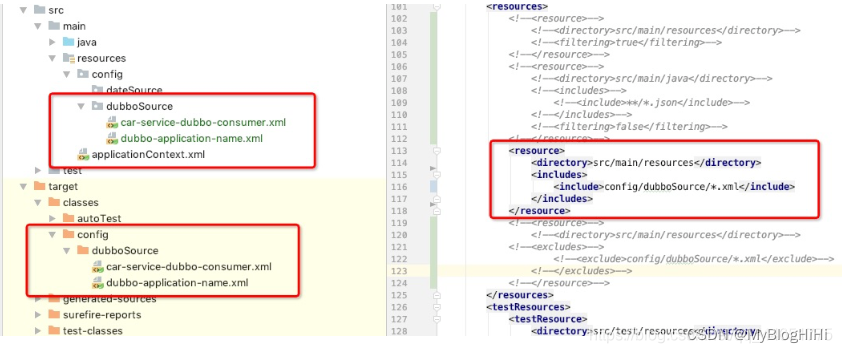
<resource><directory>class="lazy" data-src/main/resources</directory><includes><include>config/dubboSource/*.xml</include></includes></resource>includes表示仅读取directory文件夹下includes中指定的文件或文件夹的内容,即in的意思,如下图展示
5、excludes
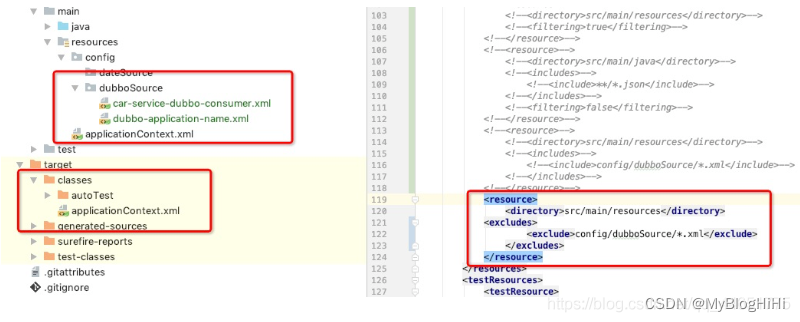
<resource><directory>class="lazy" data-src/main/resources</directory><excludes><exclude>config/dubboSource/*.xml</exclude></excludes></resource>excludes表示读取directory文件夹下但排除includes中指定的文件或文件夹的所有其他内容,即not in的意思,如下图展示
6、testResources:这个模块包含测试资源元素,其内容定义与resources类似
<testResources><testResource><directory>class="lazy" data-src/test/resources</directory><filtering>true</filtering></testResource></testResources>默认情况下,如果没有指定resources,目前认为自动会将classpath下的class="lazy" data-src/main/java下的.class文件和class="lazy" data-src/main/resources下的.xml文件放到target里头的classes文件夹下的package下的文件夹里。如果设定了resources,那么默认的就会失效,就会以设置的为准。
小结
通常filtering、includes、excludes一起使用
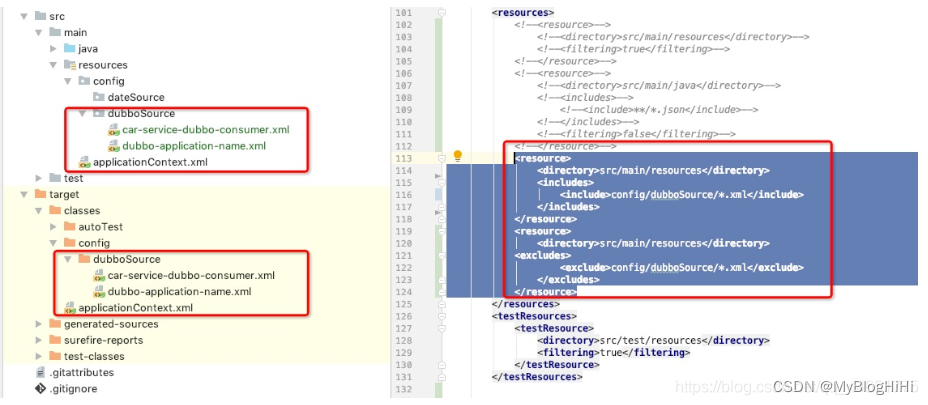
<resource><directory>class="lazy" data-src/main/resources</directory><filtering>false</filtering><includes><include>config/dubboSource/*.xml</include></includes></resource><resource><directory>class="lazy" data-src/main/resources</directory><filtering>true</filtering><excludes><exclude>config/dubboSource/*.xml</exclude></excludes></resource>表示读取class="lazy" data-src/main/resources文件夹下config/dubboSource/.xml内容,且不替换变量,读取class="lazy" data-src/main/resources文件夹下除了config/dubboSource/.xml以外的内容,且替换变量,如下截图
文章来源:
pom中resources标签解析https://www.cnblogs.com/guiyl/p/11908164.html)
来源地址:https://blog.csdn.net/MyBlogHiHi/article/details/128431158
免责声明:
① 本站未注明“稿件来源”的信息均来自网络整理。其文字、图片和音视频稿件的所属权归原作者所有。本站收集整理出于非商业性的教育和科研之目的,并不意味着本站赞同其观点或证实其内容的真实性。仅作为临时的测试数据,供内部测试之用。本站并未授权任何人以任何方式主动获取本站任何信息。
② 本站未注明“稿件来源”的临时测试数据将在测试完成后最终做删除处理。有问题或投稿请发送至: 邮箱/279061341@qq.com QQ/279061341


