RHEL7中如何添加自定义网卡并更改网卡接口
短信预约 -IT技能 免费直播动态提醒
这篇文章给大家分享的是有关RHEL7中如何添加自定义网卡并更改网卡接口的内容。小编觉得挺实用的,因此分享给大家做个参考,一起跟随小编过来看看吧。
环境
VMware Workstation Pro Red Hat Enterprise Linux Server release 7.3
查看当前网卡信息
[root@Jaking ~]# cat /etc/redhat-releaseRed Hat Enterprise Linux Server release 7.3 (Maipo)[root@Jaking ~]# ifconfigens33: flags=4163 mtu 1500 inet 192.168.10.11 netmask 255.255.255.0 broadcast 192.168.10.255 inet6 fe80::250:56ff:fe2b:88bf prefixlen 64 scopeid 0x20 ether 00:50:56:2b:88:bf txqueuelen 1000 (Ethernet) RX packets 454 bytes 44638 (43.5 KiB) RX errors 0 dropped 0 overruns 0 frame 0 TX packets 339 bytes 33150 (32.3 KiB) TX errors 0 dropped 0 overruns 0 carrier 0 collisions 0lo: flags=73 mtu 65536 inet 127.0.0.1 netmask 255.0.0.0 inet6 ::1 prefixlen 128 scopeid 0x10 loop txqueuelen 1 (Local Loopback) RX packets 112 bytes 9492 (9.2 KiB) RX errors 0 dropped 0 overruns 0 frame 0 TX packets 112 bytes 9492 (9.2 KiB) TX errors 0 dropped 0 overruns 0 carrier 0 collisions 0添加网卡
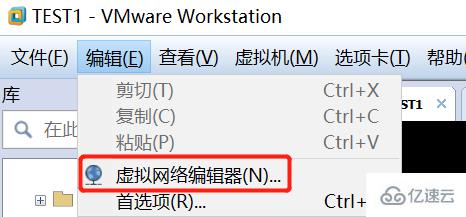
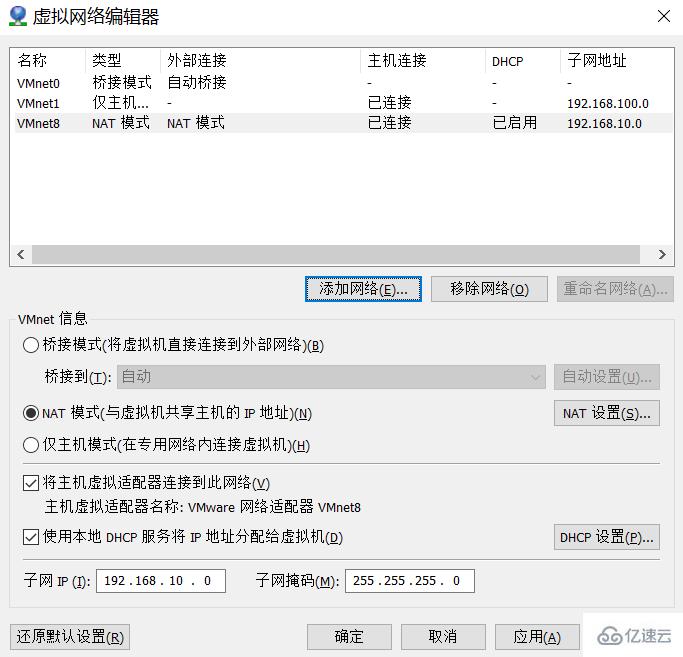
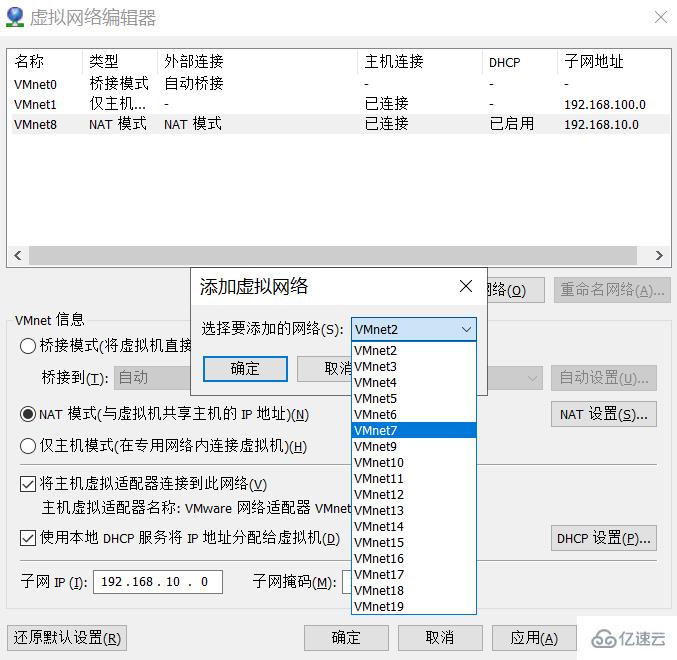
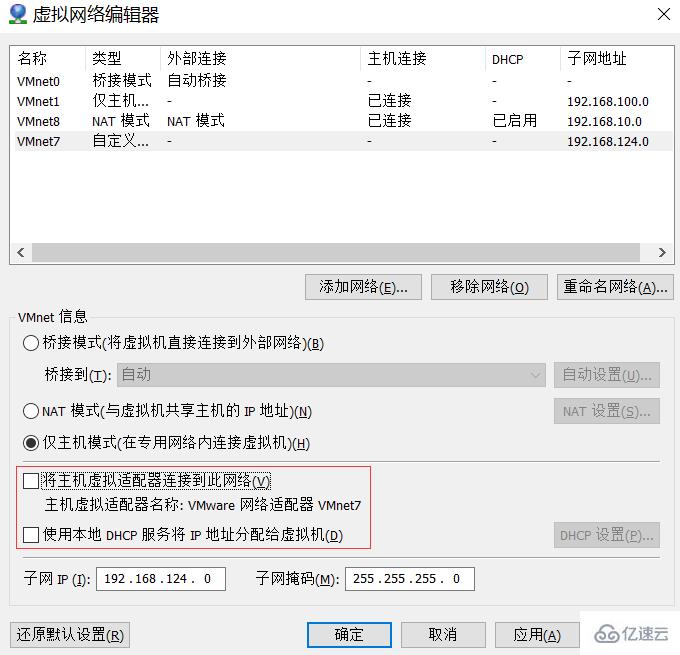
取消红框内的钩
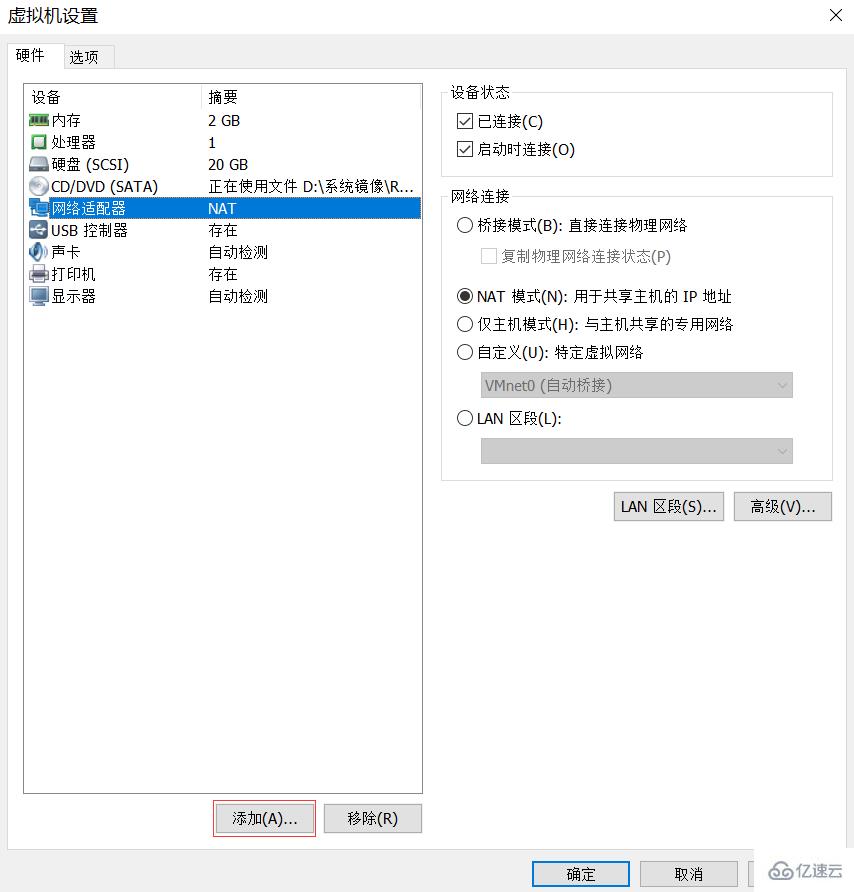
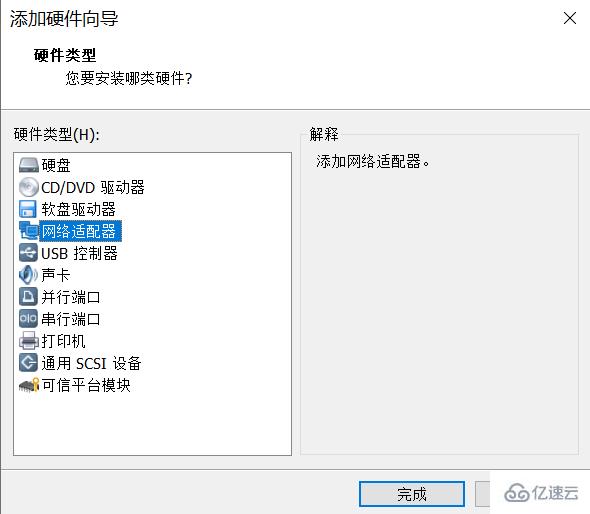
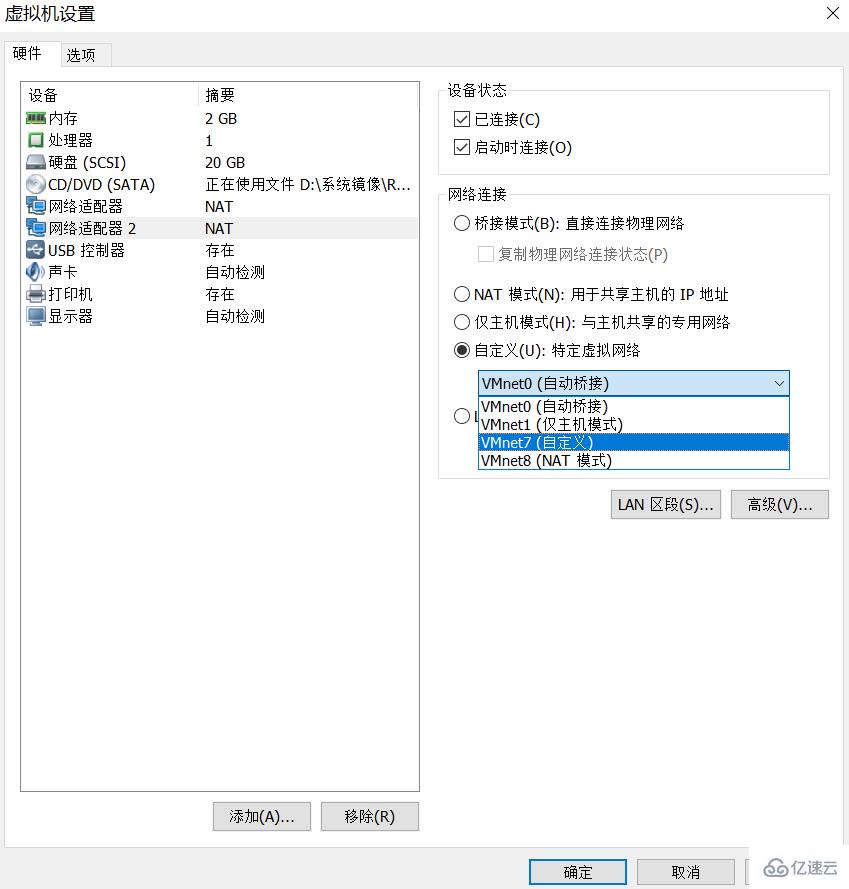
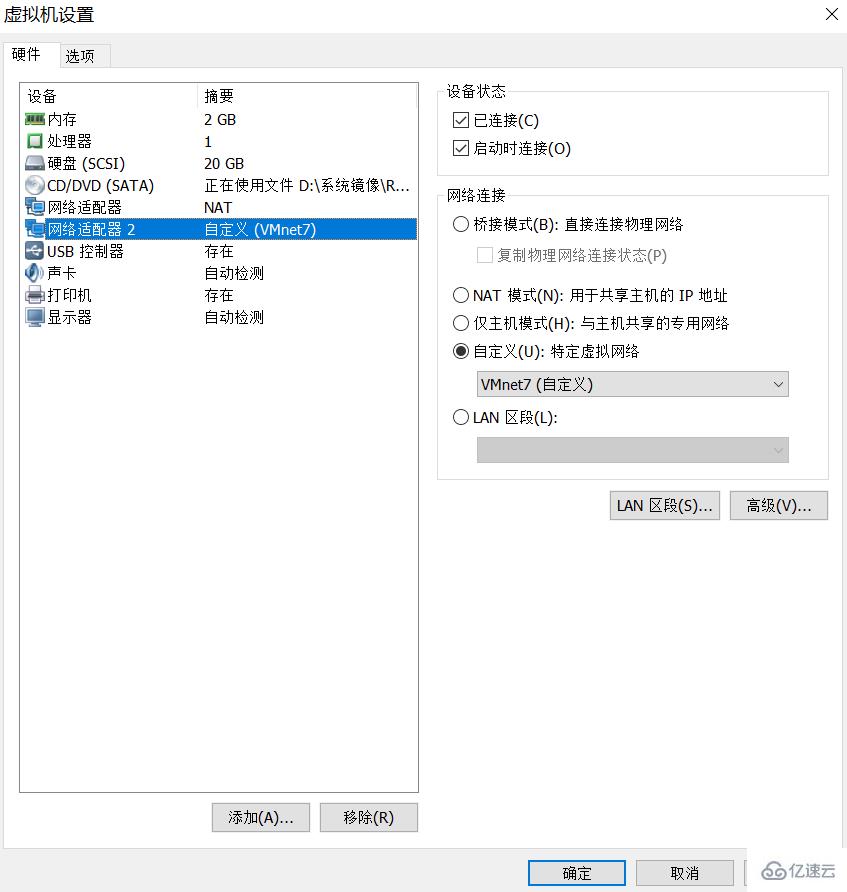
查看网卡信息
[root@Jaking ~]# ifconfigens33: flags=4163 mtu 1500 inet 192.168.10.11 netmask 255.255.255.0 broadcast 192.168.10.255 inet6 fe80::250:56ff:fe2b:88bf prefixlen 64 scopeid 0x20 ether 00:50:56:2b:88:bf txqueuelen 1000 (Ethernet) RX packets 488 bytes 47935 (46.8 KiB) RX errors 0 dropped 0 overruns 0 frame 0 TX packets 356 bytes 35698 (34.8 KiB) TX errors 0 dropped 0 overruns 0 carrier 0 collisions 0ens38: flags=4163 mtu 1500 ether 00:0c:29:46:f9:b8 txqueuelen 1000 (Ethernet) RX packets 5 bytes 594 (594.0 B) RX errors 0 dropped 0 overruns 0 frame 0 TX packets 0 bytes 0 (0.0 B) TX errors 0 dropped 0 overruns 0 carrier 0 collisions 0lo: flags=73 mtu 65536 inet 127.0.0.1 netmask 255.0.0.0 inet6 ::1 prefixlen 128 scopeid 0x10 loop txqueuelen 1 (Local Loopback) RX packets 112 bytes 9492 (9.2 KiB) RX errors 0 dropped 0 overruns 0 frame 0 TX packets 112 bytes 9492 (9.2 KiB) TX errors 0 dropped 0 overruns 0 carrier 0 collisions 0配置网卡并更改网卡接口
[root@Jaking ~]# cd /etc/sysconfig/network-scripts/[root@Jaking network-scripts]# lsifcfg-ens33 ifdown-ipv6 ifdown-TeamPort ifup-ippp ifup-routes network-functionsifcfg-lo ifdown-isdn ifdown-tunnel ifup-ipv6 ifup-sit network-functions-ipv6ifdown ifdown-post ifup ifup-isdn ifup-Teamifdown-bnep ifdown-ppp ifup-aliases ifup-plip ifup-TeamPortifdown-eth ifdown-routes ifup-bnep ifup-plusb ifup-tunnelifdown-ib ifdown-sit ifup-eth ifup-post ifup-wirelessifdown-ippp ifdown-Team ifup-ib ifup-ppp init.ipv6-global添加网卡后,需要创建对应的网卡配置文件
[root@Jaking network-scripts]# cp ifcfg-ens33 ifcfg-ens34[root@Jaking network-scripts]# vim ifcfg-ens34 TYPE=EthernetBOOTPROTO=staticDEFROUTE=yesPEERDNS=yesPEERROUTES=yesIPV4_FAILURE_FATAL=noNAME=ens34DEVICE=ens34ONBOOT=yesIPADDR=172.16.100.100NETMASK=255.255.255.0禁用ens38接口
[root@Jaking network-scripts]# ip link set ens38 down [root@Jaking network-scripts]# ifconfigens33: flags=4163 mtu 1500 inet 192.168.10.11 netmask 255.255.255.0 broadcast 192.168.10.255 inet6 fe80::250:56ff:fe2b:88bf prefixlen 64 scopeid 0x20 ether 00:50:56:2b:88:bf txqueuelen 1000 (Ethernet) RX packets 812 bytes 74791 (73.0 KiB) RX errors 0 dropped 0 overruns 0 frame 0 TX packets 537 bytes 61780 (60.3 KiB) TX errors 0 dropped 0 overruns 0 carrier 0 collisions 0lo: flags=73 mtu 65536 inet 127.0.0.1 netmask 255.0.0.0 inet6 ::1 prefixlen 128 scopeid 0x10 loop txqueuelen 1 (Local Loopback) RX packets 112 bytes 9492 (9.2 KiB) RX errors 0 dropped 0 overruns 0 frame 0 TX packets 112 bytes 9492 (9.2 KiB) TX errors 0 dropped 0 overruns 0 carrier 0 collisions 0重命名ens38接口为ens34
[root@Jaking network-scripts]# ip link set ens38 name ens34启用修改完成的ens34接口
[root@Jaking network-scripts]# ip link set ens34 up [root@Jaking network-scripts]# systemctl restart network[root@Jaking network-scripts]# ifconfig ens33: flags=4163 mtu 1500 inet 192.168.10.11 netmask 255.255.255.0 broadcast 192.168.10.255 inet6 fe80::250:56ff:fe2b:88bf prefixlen 64 scopeid 0x20 ether 00:50:56:2b:88:bf txqueuelen 1000 (Ethernet) RX packets 1389 bytes 123239 (120.3 KiB) RX errors 0 dropped 0 overruns 0 frame 0 TX packets 913 bytes 117924 (115.1 KiB) TX errors 0 dropped 0 overruns 0 carrier 0 collisions 0ens34: flags=4163 mtu 1500 inet 172.16.100.100 netmask 255.255.255.0 broadcast 192.168.100.255 ether 00:0c:29:46:f9:b8 txqueuelen 1000 (Ethernet) RX packets 5 bytes 594 (594.0 B) RX errors 0 dropped 0 overruns 0 frame 0 TX packets 2 bytes 120 (120.0 B) TX errors 0 dropped 0 overruns 0 carrier 0 collisions 0lo: flags=73 mtu 65536 inet 127.0.0.1 netmask 255.0.0.0 inet6 ::1 prefixlen 128 scopeid 0x10 loop txqueuelen 1 (Local Loopback) RX packets 148 bytes 12552 (12.2 KiB) RX errors 0 dropped 0 overruns 0 frame 0 TX packets 148 bytes 12552 (12.2 KiB) TX errors 0 dropped 0 overruns 0 carrier 0 collisions 0感谢各位的阅读!关于“RHEL7中如何添加自定义网卡并更改网卡接口”这篇文章就分享到这里了,希望以上内容可以对大家有一定的帮助,让大家可以学到更多知识,如果觉得文章不错,可以把它分享出去让更多的人看到吧!
免责声明:
① 本站未注明“稿件来源”的信息均来自网络整理。其文字、图片和音视频稿件的所属权归原作者所有。本站收集整理出于非商业性的教育和科研之目的,并不意味着本站赞同其观点或证实其内容的真实性。仅作为临时的测试数据,供内部测试之用。本站并未授权任何人以任何方式主动获取本站任何信息。
② 本站未注明“稿件来源”的临时测试数据将在测试完成后最终做删除处理。有问题或投稿请发送至: 邮箱/279061341@qq.com QQ/279061341


