Linux 安装Mysql8.0
目录
一、官网下载Mysql安装包
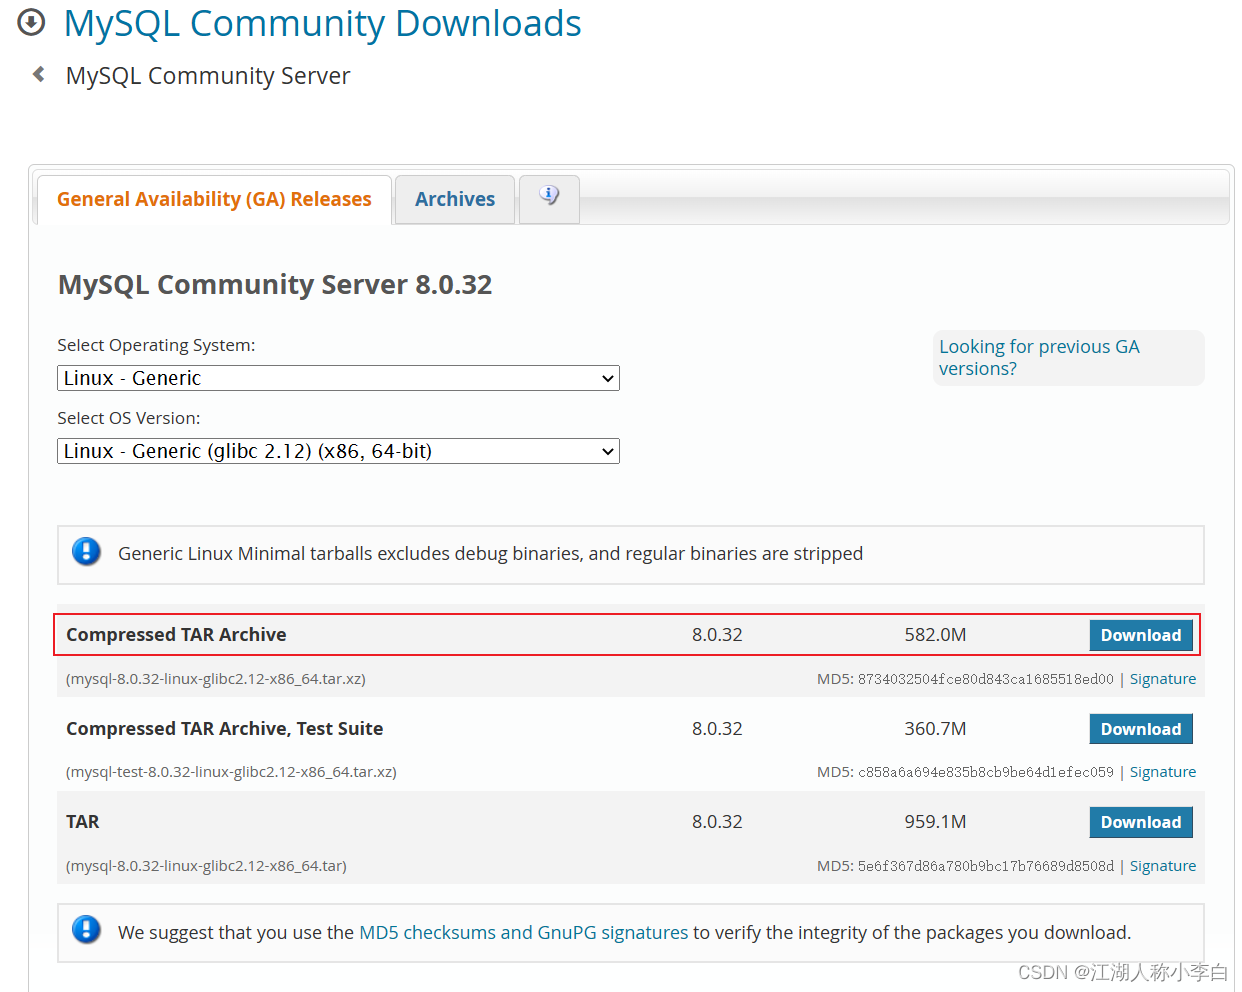
我的环境是Centos选择对应系统
MySQL :: Download MySQL Community Server
二、解压安装
上传文件至服务器,本次演示mysql上传位置:/appusr/apphome
解压执行命令:tar -xvf mysql-8.0.32-linux-glibc2.12-x86_64.tar.xz
tar -xvf mysql-8.0.32-linux-glibc2.12-x86_64.tar.xz重命名为:mysql-8.0
mv mysql-8.0.32-linux-glibc2.12-x86_64 mysql-8.0进入mysql-8.0的目录,新建data文件夹
[root@centos-tianmen apphome]# cd mysql-8.0/[root@centos-tianmen mysql-8.0]# mkdir data[root@centos-tianmen mysql-8.0]# ll总用量 296drwxr-xr-x. 2 7161 31415 4096 12月 17 00:54 bindrwxr-xr-x. 2 root root 6 3月 19 14:42 datadrwxr-xr-x. 2 7161 31415 56 12月 17 00:54 docsdrwxr-xr-x. 3 7161 31415 4096 12月 17 00:54 includedrwxr-xr-x. 6 7161 31415 201 12月 17 00:54 lib-rw-r--r--. 1 7161 31415 283374 12月 16 23:34 LICENSEdrwxr-xr-x. 4 7161 31415 30 12月 17 00:54 man-rw-r--r--. 1 7161 31415 666 12月 16 23:34 READMEdrwxr-xr-x. 28 7161 31415 4096 12月 17 00:54 sharedrwxr-xr-x. 2 7161 31415 77 12月 17 00:54 support-files新增tmp、log目录后面使用
[root@centos-tianmen mysql-8.0]# mkdir log[root@centos-tianmen mysql-8.0]# mkdir tmp三、创建mysql用户组及用户
新增用户组mysql
groupadd mysql新增用户mysql 密码mysql
useradd -g mysql mysql授权,指向mysql的安装目录
chown -R mysql.mysql /appusr/apphome/mysql-8.0/四、初始化数据库
进入mysql安装目录,我的安装目录为:/appusr/apphome/mysql-8.0
[root@centos-tianmen mysql-8.0]# cd /appusr/apphome/mysql-8.0/[root@centos-tianmen mysql-8.0]# pwd/appusr/apphome/mysql-8.0初始化数据库
执行命令:./bin/mysqld --user=mysql --basedir=/appusr/apphome/mysql-8.0/ --datadir=/appusr/apphome/mysql-8.0/data/ --initialize ;
[root@centos-tianmen mysql-8.0]# ./bin/mysqld --user=mysql --basedir=/appusr/apphome/mysql-8.0/ --datadir=/appusr/apphome/mysql-8.0/data/ --initialize ;2023-03-19T08:42:40.094583Z 0 [Warning] [MY-011070] [Server] 'Disabling symbolic links using --skip-symbolic-links (or equivalent) is the default. Consider not using this option as it' is deprecated and will be removed in a future release.2023-03-19T08:42:40.094889Z 0 [System] [MY-013169] [Server] /appusr/apphome/mysql-8.0/bin/mysqld (mysqld 8.0.32) initializing of server in progress as process 531322023-03-19T08:42:40.116956Z 1 [System] [MY-013576] [InnoDB] InnoDB initialization has started.2023-03-19T08:42:40.999879Z 1 [System] [MY-013577] [InnoDB] InnoDB initialization has ended.2023-03-19T08:42:43.037019Z 6 [Note] [MY-010454] [Server] A temporary password is generated for root@localhost: =cFY9lpinfc6记住临时密码:=cFY9lpinfc6
五、配置Mysql
修改配置文件
vi /etc/my.cnfmy.cnf配置文件自用:
#[mysqld]#datadir=/var/lib/mysql#socket=/var/lib/mysql/mysql.sock# Disabling symbolic-links is recommended to prevent assorted security risks#symbolic-links=0# Settings user and group are ignored when systemd is used.# If you need to run mysqld under a different user or group,# customize your systemd unit file for mariadb according to the# instructions in http://fedoraproject.org/wiki/Systemd#[mysqld_safe]#log-error=/var/log/mariadb/mariadb.log#pid-file=/var/run/mariadb/mariadb.pid## include all files from the config directory##!includedir /etc/my.cnf.d[mysql]#basedir=/appusr/apphome/mysql-8.0#datadir=/appusr/apphome/mysql-8.0/data/socket=/appusr/apphome/mysql-8.0/tmp/mysql.sockport=3306user=mysql#skip-grant-tables# 指定日志时间为系统时间#log_timestamps=SYSTEM#log-error=/appusr/apphome/mysql-8.0/log/mysql.err# # 指定字符集为utf8,因为mysql8.0中的默认字符集为utfmb4,会和其他程序引起兼容性问题default-character-set=utf8##[mysqld]basedir=/appusr/apphome/mysql-8.0datadir=/appusr/apphome/mysql-8.0/datasocket=/appusr/apphome/mysql-8.0/tmp/mysql.sockport=3306user=mysqllog_timestamps=SYSTEMcollation-server = utf8_unicode_cicharacter-set-server = utf8# # 指定默认认证的加密方式,mysql8.0中默认方式为caching_sha2_password,引起老版本兼容性问题default_authentication_plugin= mysql_native_password#skip-grant-tables[mysqld_safe]log-error=/appusr/apphome/mysql-8.0/log/mysqld_safe.errpid-file=/appusr/apphome/mysql-8.0/tmp/mysqld.pidsocket=/appusr/apphome/mysql-8.0/tmp/mysql.sock#skip-grant-tables[mysql.server]#basedir=/appusr/apphome/mysql-8.0datadir=/appusr/apphome/mysql-8.0/datasocket=/appusr/apphome/mysql-8.0/tmp/mysql.sockport=3306user=mysql#skip-grant-tables[mysqladmin] socket=/appusr/apphome/mysql-8.0/tmp/mysql.sock六、建立Mysql服务
进入mysql安装目录
cd /appusr/apphome/mysql-8.0/添加Mysql到系统服务
cp -a ./support-files/mysql.server /etc/init.d/mysqlchmod +x /etc/init.d/mysqlchkconfig --add mysql检查服务是否生效
chkconfig --list mysql如图:
[root@centos-tianmen mysql-8.0]# cp -a ./support-files/mysql.server /etc/init.d/mysql [root@centos-tianmen mysql-8.0]# chmod +x /etc/init.d/mysql[root@centos-tianmen mysql-8.0]# chkconfig --add mysql[root@centos-tianmen mysql-8.0]# chkconfig --list mysql注:该输出结果只显示 SysV 服务,并不包含原生 systemd 服务。SysV 配置数据可能被原生 systemd 配置覆盖。 要列出 systemd 服务,请执行 'systemctl list-unit-files'。 查看在具体 target 启用的服务请执行 'systemctl list-dependencies [target]'。mysql 0:关1:关2:开3:开4:开5:开6:关[root@centos-tianmen mysql-8.0]# 启动mysql服务
service mysql start;如有报错文件不存在,新建缺失的文件,授权mysql
[root@centos-tianmen mysql-8.0]# service mysql start;Starting MySQL... SUCCESS!查看服务状态
service mysql status;[root@centos-tianmen mysql-8.0]# service mysql status; SUCCESS! MySQL running (54691)七、修改密码
进入mysql安装目录的bin目录
cd /appusr/apphome/mysql-8.0/bin/使用上面的临时密码登录,执行命令
./mysql -uroot -p如图:
[root@centos-tianmen bin]# ./mysql -uroot -pEnter password: Welcome to the MySQL monitor. Commands end with ; or \g.Your MySQL connection id is 8Server version: 8.0.32Copyright (c) 2000, 2023, Oracle and/or its affiliates.Oracle is a registered trademark of Oracle Corporation and/or itsaffiliates. Other names may be trademarks of their respectiveowners.Type 'help;' or '\h' for help. Type '\c' to clear the current input statement.mysql> 修改密码
ALTER USER 'root'@'localhost' IDENTIFIED WITH mysql_native_password BY '新密码';OK,到此安装完成了!
八、开启远程访问
在登录状态执行下述SQL
mysql> CREATE USER 'root'@'%' IDENTIFIED BY '密码';Query OK, 0 rows affected (0.03 sec)mysql> GRANT ALL ON *.* TO 'root'@'%';Query OK, 0 rows affected (0.02 sec)mysql> ALTER USER 'root'@'%' IDENTIFIED WITH mysql_native_password BY '密码';Query OK, 0 rows affected (0.01 sec)mysql> FLUSH PRIVILEGES;Query OK, 0 rows affected (0.02 sec)九、关闭Linux防火墙
查看防火墙状态
systemctl status firewalld.service[root@centos-tianmen bin]# systemctl status firewalld.service● firewalld.service - firewalld - dynamic firewall daemon Loaded: loaded (/usr/lib/systemd/system/firewalld.service; enabled; vendor preset: enabled) Active: active (running) since 日 2023-03-19 13:39:15 CST; 4h 52min ago Docs: man:firewalld(1) Main PID: 704 (firewalld) Tasks: 2 CGroup: /system.slice/firewalld.service └─704 /usr/bin/python2 -Es /usr/sbin/firewalld --nofork --nopid3月 19 13:39:11 centos-tianmen systemd[1]: Starting firewalld - dynamic firewall daemon...3月 19 13:39:15 centos-tianmen systemd[1]: Started firewalld - dynamic firewall daemon.3月 19 13:39:15 centos-tianmen firewalld[704]: WARNING: AllowZoneDrifting is enabled. This is considered an insecure configuration option. It will be removed in a future release. Please conside...abling it now.Hint: Some lines were ellipsized, use -l to show in full.目前开启状态,关闭防火墙
systemctl stop firewalld.service再查看防火墙状态,已经关闭
[root@centos-tianmen bin]# systemctl status firewalld.service● firewalld.service - firewalld - dynamic firewall daemon Loaded: loaded (/usr/lib/systemd/system/firewalld.service; enabled; vendor preset: enabled) Active: inactive (dead) since 日 2023-03-19 18:31:56 CST; 1s ago Docs: man:firewalld(1) Process: 704 ExecStart=/usr/sbin/firewalld --nofork --nopid $FIREWALLD_ARGS (code=exited, status=0/SUCCESS) Main PID: 704 (code=exited, status=0/SUCCESS)3月 19 13:39:11 centos-tianmen systemd[1]: Starting firewalld - dynamic firewall daemon...3月 19 13:39:15 centos-tianmen systemd[1]: Started firewalld - dynamic firewall daemon.3月 19 13:39:15 centos-tianmen firewalld[704]: WARNING: AllowZoneDrifting is enabled. This is considered an insecure configuration option. It will be removed in a future release. Please conside...abling it now.3月 19 18:31:50 centos-tianmen systemd[1]: Stopping firewalld - dynamic firewall daemon...3月 19 18:31:56 centos-tianmen systemd[1]: Stopped firewalld - dynamic firewall daemon.Hint: Some lines were ellipsized, use -l to show in full.设置永久关闭防火墙
systemctl disable firewalld.service[root@centos-tianmen bin]# systemctl disable firewalld.serviceRemoved symlink /etc/systemd/system/multi-user.target.wants/firewalld.service.Removed symlink /etc/systemd/system/dbus-org.fedoraproject.FirewallD1.service.链接Mysql

OK,完活
来源地址:https://blog.csdn.net/qq_42307277/article/details/129650561
免责声明:
① 本站未注明“稿件来源”的信息均来自网络整理。其文字、图片和音视频稿件的所属权归原作者所有。本站收集整理出于非商业性的教育和科研之目的,并不意味着本站赞同其观点或证实其内容的真实性。仅作为临时的测试数据,供内部测试之用。本站并未授权任何人以任何方式主动获取本站任何信息。
② 本站未注明“稿件来源”的临时测试数据将在测试完成后最终做删除处理。有问题或投稿请发送至: 邮箱/279061341@qq.com QQ/279061341


![[mysql]mysql8修改root密码](https://static.528045.com/imgs/1.jpg?imageMogr2/format/webp/blur/1x0/quality/35)


