怎么让chatgpt将html中的图片转为base64
这篇文章主要介绍“怎么让chatgpt将html中的图片转为base64”的相关知识,小编通过实际案例向大家展示操作过程,操作方法简单快捷,实用性强,希望这篇“怎么让chatgpt将html中的图片转为base64”文章能帮助大家解决问题。
加载贼慢的原因:
刚才所说的服务端响应慢,那这个交给后端去搞就好(这个是重中之重)
官网的图片请求是在是太多了,而我们知道 http 请求是有次数限制的(http1.1),太多的话其他只能处于阻塞状态
那第二点自然是需要前端去搞了,图片太多,导致 http 请求太多,那好办,把小图片转 base64 不就好。 嗯,思路很简单,如果是前后端分离的项目,我们一般无脑配置 webpack url-loader 的体积限制就好,或者配置 webpack5 的 asset,即在导出一个 data URI 和发送一个单独的文件之间自动选择:
rules: [ { test: /\.(png|jpe?g|svg|gif)$/, //webpack4 start use: [ { loader: 'url-loader', options: { limit: 10 * 1024 }, }, ], //webpack4 end // webapack5 start type:'asset/inline', parser: { dataUrlCondition: { maxSize: 10 * 1024, // 小于10k则转为base64 }, }, // webapack5 end }, ],很简单对吧,但当你想快速 cv 以上配置的时候,发现,前端代码都是混在后端代码里面,一堆 html 文件,html 里面又混杂着一堆的 Thymeleaf 语法(Thymeleaf 是一个跟 Velocity、FreeMarker 类似的模板引擎,它可以完全替代 JSP,JSP??都啥年代了)
但没办法,领导可不管用啥方式,只要有个方法把 html 里面图片小于某个指定值,如 10k,那就转 base64,让这些小图片不走 http 请求。
思路
那么,正常的路走不通(当然也有可能有其他更快捷的方式,只是比较赶,暂时想不到更好、更简单的方式实现),那就另辟蹊径。
全体流程如下:
mvn clean // marven 清空输出目录
mvn compile // marven编译
将所有 html 的的小图片都转 base64
mvn package // marven 打包
以上主要重点关注第3点,既然要将所有 html 的的小图片都转 base64,那么自然而然可以通过写个 node 脚本来实现,大概可以分为以下几个步骤:
递归读取指定目录下的所有 html 文件路径 htmlPaths,这里我们假设所有 html 都放在 backend/templates 里面
遍历每个路径,读取对应的 html,然后通过正则匹配到每个 html 里面的所有 img 对应的 class="lazy" data-src,存放到 imgclass="lazy" data-srcs 里面
遍历每个 img 的 class="lazy" data-src,读取 imageBuffer,并转为 base64
再将得到的 base64 替换原先的 class="lazy" data-src
最后将新的 html 替换旧的 html
实现过程
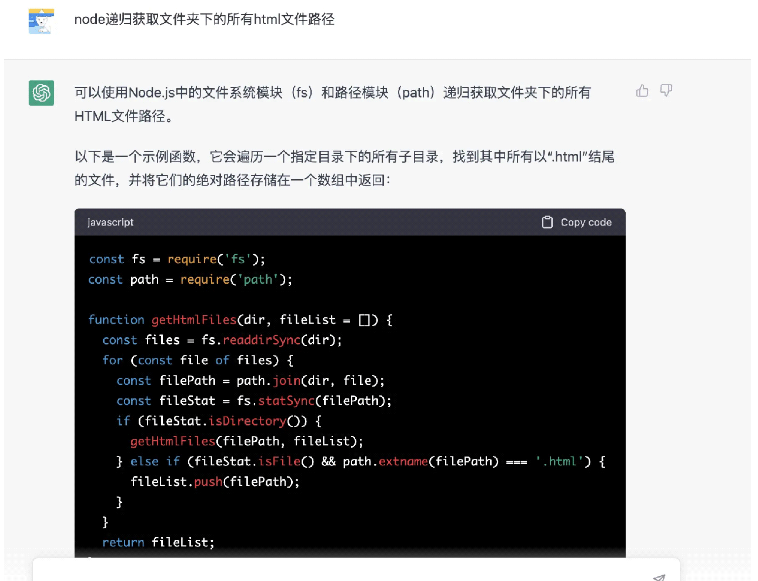
递归读取指定目录下的所有 html 文件路径 htmlPaths
首先判断入口目录的下的内容,是文件的话就判断是否以.html 结尾,是的话则放入 htmlFilePaths,是目录的话则递归遍历,那我们来问神奇的 chatgpt:

嗯,很不错,第一次几乎完美,顺利拿到所有的 html 路径
获取每个 html 里面的图片 class="lazy" data-src
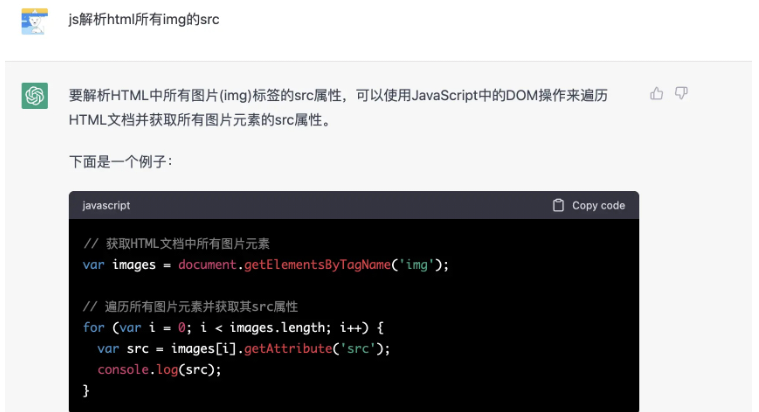
自然而然想到用正则匹配来做,所以我马上问:

一看结果就不是我想要的,当然也是我描述的不清晰,导致 chatgpt 以为要获取 html 文档的图片 class="lazy" data-src
获取 html 字符串的所有图片 class="lazy" data-src
应该问要获取 html 字符串的,所以我接着问:

// 定义匹配图片标签的正则表达式var imgRegex = /<img\s+[^>]*class="lazy" data-src=["']([^"']*)["'][^>]*>/gi;// 要解析的HTML字符串var htmlString = '<img class="lazy" data-src="image1.jpg"> <img class="lazy" data-src="image2.jpg">';// 遍历所有匹配到的图片标签并获取其class="lazy" data-src属性var matches;while ((matches = imgRegex.exec(htmlString)) !== null) { var class="lazy" data-src = matches[1]; console.log(class="lazy" data-src);}运行后,得到的结果:

不错不错,再接再厉。
忽略注释的代码
但 html 代码可能 img 被注释了,如 <!-- <img class="lazy" data-src='xxx.jpg'> -->,那么我们实际上没必要去转换,故我们让个让其忽略注释的:

那我们来试试,将其中注释代码中插入 img,看看是否会解析:
// 定义匹配图片标签的正则表达式var imgRegex = /<img\s+[^>]*class="lazy" data-src=["']([^"']*)["'][^>]*>/gi;// 定义匹配注释的正则表达式var commentRegex = /<!--[\s\S]*?-->/g;// 要解析的HTML字符串var htmlString = '<!-- <img class="lazy" data-src="image3.jpg"> --> <img class="lazy" data-src="image1.jpg"> <img class="lazy" data-src="image2.jpg">';// 删除所有注释htmlString = htmlString.replace(commentRegex, '');// 遍历所有匹配到的图片标签并获取其class="lazy" data-src属性var matches;while ((matches = imgRegex.exec(htmlString)) !== null) { var class="lazy" data-src = matches[1]; console.log(class="lazy" data-src);}
可以看到被注释掉的 image3 不会被匹配到
本身是 base64,则忽略
继续继续,但图片 class="lazy" data-src 可能一开始就是 base64 了,就没必要转了,而 base64 是 data:image 开头的,所以我们再让它加下条件:

// 定义匹配图片标签的正则表达式var imgRegex = /<img\s+[^>]*class="lazy" data-src=["']((?!data:image)[^"']*)["'][^>]*>/gi;// 要解析的HTML字符串var htmlString = '<img class="lazy" data-src="image1.jpg"> <img class="lazy" data-src="data:image/png;base64,iVBORw0KG..."> <img class="lazy" data-src="image2.jpg"><!-- <img class="lazy" data-src="image3.jpg"> -->';// 遍历所有匹配到的不以 data:image 开头的图片标签并获取其class="lazy" data-src属性var matches;while ((matches = imgRegex.exec(htmlString)) !== null) { var class="lazy" data-src = matches[1]; console.log(class="lazy" data-src);}我们运行看下结果

成功跳过了 base64 的,但是,好像没有了忽略注释代码的条件,啊这。。
所以我就让他忽略注释和 base64 的,但好像一直丢三落四,按下葫芦浮起瓢,大家可以看看

上面的注释的被匹配到了


注释又又又被匹配到了,算了,我直接问如果忽略 base64,然后再组合忽略注释的就好,组合后的代码如下:
const imgRegex = /<img\s+[^>]*class="lazy" data-src=["']((?!data:image)[^"']*)["'][^>]*>/gi;// 定义匹配注释的正则表达式const commentRegex = /<!--[\s\S]*?-->/g// 删除所有注释var htmlString = '<img class="lazy" data-src="image1.jpg"> <img class="lazy" data-src="data:image/png;base64,iVBORw0KG..."> <img class="lazy" data-src="image2.jpg"><!-- <img class="lazy" data-src="image3.jpg"> -->';htmlString = htmlString.replace(commentRegex, '')// 遍历所有匹配到的图片标签并获取其class="lazy" data-src属性const imgclass="lazy" data-srcs = []let matches;while ((matches = imgRegex.exec(htmlString)) !== null) {const class="lazy" data-src = matches[1];imgclass="lazy" data-srcs.push(class="lazy" data-src)}console.log(imgclass="lazy" data-srcs)
忽略 Thymeleaf 语法
还有个问题,img 的 class="lazy" data-src 可能是通过服务端渲染导入的,那么我们要忽略掉,大致语法为 <img th:class="lazy" data-src="${t.imgUrl1}" />,也就是以 th:开头的

// 定义匹配图片标签的正则表达式var imgRegex = /<img\s+[^>]*class="lazy" data-src=["']((?!data:image|@{)(?!\s*th:class="lazy" data-src)[^"']*)["'][^>]*>/gi;// 要解析的HTML字符串var htmlString = '<img class="lazy" data-src="image1.jpg"> <img class="lazy" data-src="@{some/url}"> <img class="lazy" data-src="data:image/png;base64,iVBORw0KG..."> <img class="lazy" data-src="image2.jpg" th:class="lazy" data-src="@{some/other/url}">';// 遍历所有匹配到的不以 data:image、@{ 和包含 th:class="lazy" data-src 的图片标签并获取其class="lazy" data-src属性var matches;while ((matches = imgRegex.exec(htmlString)) !== null) { var class="lazy" data-src = matches[1]; console.log(class="lazy" data-src);}
上面的@{可以忽略,实际上也是属于 Thymeleaf 语法,屏蔽 th:class="lazy" data-src 即可
结合起来,封装成一个函数
function getImgclass="lazy" data-srcInHtml(htmlString) { const imgRegex = /<img\s+[^>th:]*class="lazy" data-src=["']((?!data:image)[^"']*)["'][^>]*>/gi; // 定义匹配注释的正则表达式 const commentRegex = /<!--[\s\S]*?-->/g // 删除所有注释 htmlString = htmlString.replace(commentRegex, '') // 遍历所有匹配到的图片标签并获取其class="lazy" data-src属性 const imgclass="lazy" data-srcs = [] let matches; while ((matches = imgRegex.exec(htmlString)) !== null) { const class="lazy" data-src = matches[1]; imgclass="lazy" data-srcs.push(class="lazy" data-src) } return imgclass="lazy" data-srcs.filter(Boolean)}运行下,看下结果:

class="lazy" data-src 转 base64
自此,我们拿到所有 html 里面的 class="lazy" data-src 了,那么判断下是否小于指定 size,是的话转 base64
获取文件大小可通过 fs 的 statSync 来拿到对应文件的 size,如下
function getFileSize(filePath) { const stat = fs.statSync(filePath) return stat.size}如果满足条件则将图片转 base64,而图片本身是 Buffer,所以要转一下:
function imageToBase64(filePath) { // 读取图片文件 const imageBuffer = fs.readFileSync(filePath) const extname = getExtname(filePath) // 将图片文件转换为 base64 编码字符串 const base64String = Buffer.from(imageBuffer).toString('base64') return `data:image/${extname.slice(1)};base64,${base64String}`}通过加上前缀data:image/${extname.slice(1)};base64,,其中 extname 是文件后缀名,通过path.extname拿到:
function getExtname(filePath) { return path.extname(filePath)}每得到一个 base64,则替换原先的 class="lazy" data-src:
htmlString = htmlString.replace(class="lazy" data-src, imgBase64)最后将新的 html 替换旧的 html
html 下满足条件的 class="lazy" data-src 全部替换好后,就可以将新的 html 替换老的了,实际上也就是重写回去:
writeFile(htmlPath, htmlString)性能优化
但我们发现整个过程中有两处可以优化代码:
如果 class="lazy" data-src 大于指定尺寸,那么下次遇到直接跳过,不再获取尺寸大小
一个图片可能被多处引用到,那么转 base64 后,下次遇到就没必要再转了,直接复用即可
针对第一点,我们可以通过声明一个 Set,存放大于指定尺寸的 class="lazy" data-src:
for (const class="lazy" data-src of imgclass="lazy" data-srcs) { if (imgOverSizeSet.has(class="lazy" data-src)) continue let absoluteclass="lazy" data-src = class="lazy" data-src // 如果不是相对路径,那么转换为绝对路径 if (!class="lazy" data-src.startsWith('.')) absoluteclass="lazy" data-src = path.join(STATIC_PATH, class="lazy" data-src) // 不存在或者超出限制,则不替换 if (getFileSize(absoluteclass="lazy" data-src) >= FILE_LIMIE_SIZE) { imgNotExistOrOverSizeSet.add(class="lazy" data-src) continue }}针对第二点,我们可以通过声明一个 Map,key 为 class="lazy" data-src,value 为 base64:
const imgclass="lazy" data-src2Base64Map = new Map()每次判断到对应的 class="lazy" data-src 有值,则直接拿之前的 base64,不再转化:
let imgBase64 = imgclass="lazy" data-src2Base64Map.get(class="lazy" data-src)if (!imgBase64) { imgBase64 = imageToBase64(absoluteclass="lazy" data-src) imgclass="lazy" data-src2Base64Map.set(class="lazy" data-src, imgBase64)}总的代码
const fs = require('fs')const path = require('path')function resolve(relativePath) { return path.resolve(__dirname, relativePath)}const STATIC_PATH = resolve('xxx')const TEMPLATE_PATH = resolve('yyy')const FILE_LIMIE_SIZE = 1024 * 10function imageToBase64(filePath) { // 读取图片文件 const imageBuffer = fs.readFileSync(filePath) const extname = getExtname(filePath) // 将图片文件转换为 base64 编码字符串 const base64String = Buffer.from(imageBuffer).toString('base64') return `data:image/${extname.slice(1)};base64,${base64String}`}function getFileSize(filePath) { const stat = fs.statSync(filePath) return stat.size}function getExtname(filePath) { return path.extname(filePath)}function getHtmlPaths(dir, filePaths = []) { const files = fs.readdirSync(dir); for (const file of files) { const filePath = path.join(dir, file); const fileStat = fs.statSync(filePath); if (fileStat.isDirectory()) { getHtmlPaths(filePath, filePaths); } else if (fileStat.isFile() && getExtname(filePath) === '.html') { filePaths.push(filePath); } } return filePaths;}function readFile(filePath) { return fs.readFileSync(filePath, 'utf-8')}function writeFile(filePath, source) { return fs.writeFileSync(filePath, source)}function getImgclass="lazy" data-srcInHtml(htmlString) { const imgRegex = /<img\s+[^>th:]*class="lazy" data-src=["']((?!data:image)[^"']*)["'][^>]*>/gi; // 定义匹配注释的正则表达式 const commentRegex = /<!--[\s\S]*?-->/g // 删除所有注释 htmlString = htmlString.replace(commentRegex, '') // 遍历所有匹配到的图片标签并获取其class="lazy" data-src属性 const imgclass="lazy" data-srcs = [] let matches; while ((matches = imgRegex.exec(htmlString)) !== null) { const class="lazy" data-src = matches[1]; imgclass="lazy" data-srcs.push(class="lazy" data-src) } return imgclass="lazy" data-srcs.filter(Boolean)}function main() { const htmlPaths = getHtmlPaths(TEMPLATE_PATH) const imgclass="lazy" data-src2Base64Map = new Map() const imgNotExistOrOverSizeSet = new Set() htmlPaths.forEach(htmlPath => { let htmlString = readFile(htmlPath) const imgclass="lazy" data-srcs = getImgclass="lazy" data-srcInHtml(htmlString) if (!imgclass="lazy" data-srcs.length) return for (const class="lazy" data-src of imgclass="lazy" data-srcs) { if (imgNotExistOrOverSizeSet.has(class="lazy" data-src)) continue let absoluteclass="lazy" data-src = class="lazy" data-src // console.log(imgclass="lazy" data-srcs) // 如果不是相对路径,那么转换为绝对路径 if (!class="lazy" data-src.startsWith('.')) absoluteclass="lazy" data-src = path.join(STATIC_PATH, class="lazy" data-src) const isExist = fs.existsSync(absoluteclass="lazy" data-src) if (!isExist) console.log('not isExist', class="lazy" data-src) // 不存在或者超出限制,则不替换 if (!isExist || getFileSize(absoluteclass="lazy" data-src) >= FILE_LIMIE_SIZE) { imgNotExistOrOverSizeSet.add(class="lazy" data-src) continue } let imgBase64 = imgclass="lazy" data-src2Base64Map.get(class="lazy" data-src) if (!imgBase64) { imgBase64 = imageToBase64(absoluteclass="lazy" data-src) imgclass="lazy" data-src2Base64Map.set(class="lazy" data-src, imgBase64) } htmlString = htmlString.replace(class="lazy" data-src, imgBase64) } // 替换好后,写回 writeFile(htmlPath, htmlString) })}main()关于“怎么让chatgpt将html中的图片转为base64”的内容就介绍到这里了,感谢大家的阅读。如果想了解更多行业相关的知识,可以关注编程网行业资讯频道,小编每天都会为大家更新不同的知识点。
免责声明:
① 本站未注明“稿件来源”的信息均来自网络整理。其文字、图片和音视频稿件的所属权归原作者所有。本站收集整理出于非商业性的教育和科研之目的,并不意味着本站赞同其观点或证实其内容的真实性。仅作为临时的测试数据,供内部测试之用。本站并未授权任何人以任何方式主动获取本站任何信息。
② 本站未注明“稿件来源”的临时测试数据将在测试完成后最终做删除处理。有问题或投稿请发送至: 邮箱/279061341@qq.com QQ/279061341


