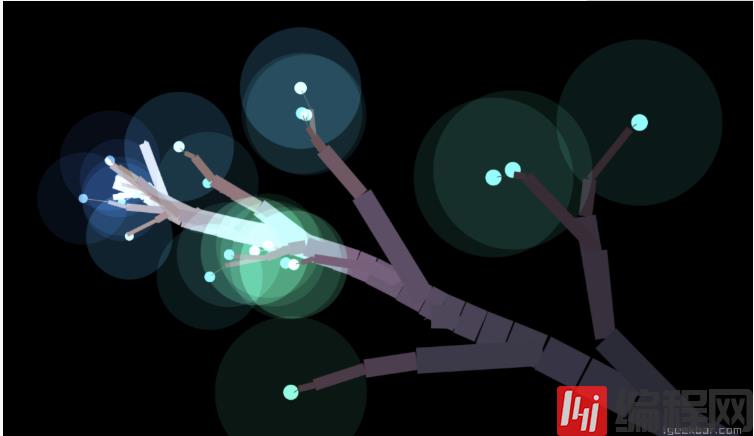
使用css与js生成的唯美炫酷的图形树效果
短信预约 -IT技能 免费直播动态提醒
这篇文章主要介绍了使用css与js生成的唯美炫酷的图形树效果,具有一定借鉴价值,感兴趣的朋友可以参考下,希望大家阅读完这篇文章之后大有收获,下面让小编带着大家一起了解一下。
效果图如下所示:

在线演示:Here~
给大家分享一个使用css与js生成的唯美炫酷的图形树效果,相关代码如下:
<!doctype html><html lang="en"><head> <meta charset="UTF-8"> <title>cloth</title> <style> @import url(http://fonts.googleapis.com/css?family=Poiret+One);html { overflow: hidden; touch-action: none; content-zooming: none;}body { position: absolute; margin: 0; padding: 0; background: #000; width: 100%; height: 100%;}#canvas { width: 100%; height: 100%; background: #000; position: absolute;}#text { position: absolute; left: 0; top: 50%; width: 100%; pointer-events: none;}#text div { position: absolute; color: #888; left: 0; width: 100%; text-align: center; top: -12vmin; font-family: 'Poiret One', cursive; font-size: 6vmin;} </style></head><body> <canvas id="canvas"></canvas><div id="text"> <div id="clic" nowrap></div><script type="text/javascript" class="lazy" data-src="http://cdn.gbtags.com/jquery/1.11.1/jquery.min.js"></script> <script> ! function() { "use strict"; // variables var root = null; var hue = 0; var automove = true; var angleX = 0; var angleY = 0; ///////////////////////// var resolution = 1; var maxLevels = 6; var branchLength = 10 * resolution; var leafSize = 100; var growSpeed = 2; var maxAngle = 1.2; var freq = 0.3; ///////////////////////// // branch constructor function Branch(parent, level, hue, x, y) { this.parent = parent; this.b1 = null; this.b2 = null; this.b3 = null; this.hue = hue; this.p0 = parent ? parent.p1 : new Point(x, y, 0); this.p1 = new Point( x, y, parent === root ? 0 : ( parent ? parent.p1.z + ( level ? Math.random() * 10 - 5 : 0 ) : 0 ) ); this.level = level; this.life = 0; this.angle = 0; this.vx = 0; this.vy = 0; } // grow branch Branch.prototype.grow = function() { // z move this.p1.z--; // 3D projection this.p1.project(); // recursively grow children branches this.b1 && this.b1.grow(); this.b2 && this.b2.grow(); // grow if (this.life-- > 1) { this.p1.x += this.vx; this.p1.y += this.vy; } // done - push more children branches if (this.life === 1 && this.level > 0) { this.b1 = newBranch(this); if (Math.random() <= freq) this.b2 = newBranch(this); this.life--; } // cut the tree if (this.p0.z <= -250) { this.parent = null; } // draw the branch var width = resolution * (this.level === 1 ? 1 : ((this.level + 1) * (this.level + 1)) * 0.5 * this.p1.scale ); var color = 100 - Math.abs(this.p0.z * 0.5); ctx.beginPath(); if (this.level) { ctx.lineWidth = width; ctx.strokeStyle = "hsl(" + (this.hue % 360) + ", 14%," + color + "%)"; ctx.moveTo(this.p0.xp, this.p0.yp); ctx.lineTo(this.p1.xp, this.p1.yp); ctx.stroke(); } else { ctx.globalCompositeOperation = "lighter"; var c = ((this.hue + 180) % 360); ctx.fillStyle = "hsl(" + c + ", 100%, 70%)"; ctx.arc(this.p1.xp, this.p1.yp, width * leafSize * 0.1, 0, Math.PI * 2); ctx.fill(); ctx.beginPath(); ctx.fillStyle = "hsl(" + c + ", 60%, 6%)"; ctx.arc(this.p1.xp, this.p1.yp, width * leafSize, 0, Math.PI * 2); ctx.fill(); ctx.globalCompositeOperation = "source-over"; } } // 3D point constructor function Point(x, y, z) { this.x = x; this.y = y; this.z = z; this.scale = 0; this.xp = 0; this.yp = 0; } // 3D point projection Point.prototype.project = function() { this.scale = 265 / (265 + this.z); this.xp = canvas.centerX + (this.x - canvas.centerX) * this.scale; this.yp = canvas.centerY + (this.y - canvas.centerY) * this.scale; } // new branch factory function newBranch(parent) { var branch = new Branch(parent, parent.level - 1, hue, parent.p1.x, parent.p1.y); branch.angle = Math.atan2( parent.p1.y - parent.p0.y, parent.p1.x - parent.p0.x ) + (branch.level ? (Math.random() * maxAngle - (maxAngle * 0.5)) : 0 ); branch.vx = Math.cos(branch.angle) * growSpeed; branch.vy = Math.sin(branch.angle) * growSpeed; branch.life = branch.level ? Math.round(Math.random() * branch.level * branchLength) + 1 : 2; return branch; } // animate the tree function tree() { // clear screen ctx.fillStyle = '#000'; ctx.fillRect(0, 0, canvas.width, canvas.height); // pointer trail if (pointer.moveDistance > 10 * resolution) { pointer.moveDistance = 0; // main trunk var branch = new Branch( root, root.level, hue, root.p1.x, root.p1.y ); // add another branch if (Math.random() <= freq) root.b1 = newBranch(root); // new root root = branch; root.p1.x = pointer.x; root.p1.y = pointer.y; } // increment color hue++; // traverse the tree var trunk = root; while (trunk) { trunk.grow(); trunk = trunk.parent; } } // prepare the canvas var canvas = { elem: document.getElementById('canvas'), resize: function() { this.width = this.elem.width = this.elem.offsetWidth * resolution; this.height = this.elem.height = this.elem.offsetHeight * resolution; this.centerX = this.width * 0.5; this.centerY = this.height * 0.5; } } var ctx = canvas.elem.getContext("2d"); window.addEventListener('resize', canvas.resize.bind(canvas), false); canvas.resize(); // pointer events var pointer = { x: 0, y: 0, px: 0, py: 0, moveDistance: 0, move: function(e) { e.preventDefault(); var pointer = e.targetTouches ? e.targetTouches[0] : e; // stop automove if (automove) { automove = false; document.getElementById("clic").innerHTML = ""; } this.x = pointer.clientX * resolution; this.y = pointer.clientY * resolution; this.distance(); // render tree requestAnimationFrame(tree); }, distance: function() { var dx = this.x - this.px; var dy = this.y - this.py; this.moveDistance += Math.sqrt(dx * dx + dy * dy); // speed limit if (!automove && this.moveDistance > 40) { this.x = this.px + dx * 0.1; this.y = this.py + dy * 0.1; } this.px = this.x; this.py = this.y; } } window.addEventListener("mousemove", pointer.move.bind(pointer), false); canvas.elem.addEventListener("touchmove", pointer.move.bind(pointer), false); // auto start ! function auto() { automove && requestAnimationFrame(auto); // lissajou pointer.x = canvas.centerX + canvas.centerX * Math.cos(angleX += 0.02) * 0.20; pointer.y = canvas.centerY + canvas.centerY * Math.sin(angleY += 0.04) * 0.25; pointer.distance(); // create the first branch if (!root) { root = new Branch(false, maxLevels, hue, pointer.x, pointer.y); root.p0 = root.p1; root.p0.project(); } // render tree tree(); }();}(); </script></body></html>感谢你能够认真阅读完这篇文章,希望小编分享的“使用css与js生成的唯美炫酷的图形树效果”这篇文章对大家有帮助,同时也希望大家多多支持编程网,关注编程网行业资讯频道,更多相关知识等着你来学习!
免责声明:
① 本站未注明“稿件来源”的信息均来自网络整理。其文字、图片和音视频稿件的所属权归原作者所有。本站收集整理出于非商业性的教育和科研之目的,并不意味着本站赞同其观点或证实其内容的真实性。仅作为临时的测试数据,供内部测试之用。本站并未授权任何人以任何方式主动获取本站任何信息。
② 本站未注明“稿件来源”的临时测试数据将在测试完成后最终做删除处理。有问题或投稿请发送至: 邮箱/279061341@qq.com QQ/279061341


