FluentMybatis怎么实现mybatis动态sql拼装和fluent api语法
这篇文章主要讲解了“FluentMybatis怎么实现mybatis动态sql拼装和fluent api语法”,文中的讲解内容简单清晰,易于学习与理解,下面请大家跟着小编的思路慢慢深入,一起来研究和学习“FluentMybatis怎么实现mybatis动态sql拼装和fluent api语法”吧!
目录
开始第一个例子: Hello World
新建演示用的数据库结构
创建数据库表对应的Entity类
运行测试来见证Fluent Mybatis的神奇
配置spring bean定义
使用Junit4和Spring-test来执行测试
开始第一个例子: Hello World
新建Java工程,设置maven依赖
新建maven工程,设置项目编译级别为Java8及以上,引入fluent mybatis依赖包。
<dependencies> <!-- 引入fluent-mybatis 运行依赖包, scope为compile --> <dependency> <groupId>com.github.atool</groupId> <artifactId>fluent-mybatis</artifactId> <version>1.3.1</version> </dependency> <!-- 引入fluent-mybatis-processor, scope设置为provider 编译需要,运行时不需要 --> <dependency> <groupId>com.github.atool</groupId> <artifactId>fluent-mybatis-processor</artifactId> <version>1.3.1</version> </dependency></dependencies>新建演示用的数据库结构
create schema fluent_mybatis_tutorial;create table hello_world( id bigint unsigned auto_increment primary key, say_hello varchar(100) null, your_name varchar(100) null, gmt_create datetime DEFAULT NULL COMMENT '创建时间', gmt_modified datetime DEFAULT NULL COMMENT '更新时间', is_deleted tinyint(2) DEFAULT 0 COMMENT '是否逻辑删除') ENGINE = InnoDB CHARACTER SET = utf8 comment '简单演示表';创建数据库表对应的Entity类
创建数据库表对应的Entity类: HelloWorldEntity, 你只需要简单的做3个动作:
根据驼峰命名规则命名Entity类和字段
HelloWorldEntity继承IEntity接口类
在HelloWorldEntity类上加注解 @FluentMybatis
@FluentMybatispublic class HelloWorldEntity implements IEntity { private Long id; private String sayHello; private String yourName; private Date gmtCreate; private Date gmtModified; private Boolean isDeleted; // get, set, toString 方法}很简单吧,在这里,你即不需要配置任何mybatis xml文件, 也不需要写任何Mapper接口, 但你已经拥有了强大的增删改查的功能,并且是Fluent API,让我们写一个测试来见证一下Fluent Mybatis的魔法力量!
运行测试来见证Fluent Mybatis的神奇
为了运行测试, 我们还需要进行JUnit和Spring Test相关配置。
配置spring bean定义
数据源DataSource配置
mybatis的mapper扫描路径
mybatis的SqlSessionFactoryBean
@ComponentScan(basePackages = "cn.org.atool.fluent.mybatis.demo1")@MapperScan("cn.org.atool.fluent.mybatis.demo1.entity.mapper")@Configurationpublic class HelloWorldConfig { @Bean public DataSource dataSource() { BasicDataSource dataSource = new BasicDataSource(); dataSource.setDriverClassName("com.mysql.jdbc.Driver"); dataSource.setUrl("jdbc:mysql://localhost:3306/fluent_mybatis_tutorial?useUnicode=true&characterEncoding=utf8"); dataSource.setUsername("root"); dataSource.setPassword("password"); return dataSource; } @Bean public SqlSessionFactoryBean sqlSessionFactoryBean(DataSource dataSource) { SqlSessionFactoryBean bean = new SqlSessionFactoryBean(); bean.setDataSource(dataSource); return bean; }}使用Junit4和Spring-test来执行测试
使用spring-test初始化spring容器
注入HelloWorldEntity对应的Mapper类: HelloWorldMapper, 这个类是fluent mybatis编译时生成的。
使用HelloWorldMapper进行删除、插入、查询、修改操作。
@RunWith(SpringJUnit4ClassRunner.class)@ContextConfiguration(classes = HelloWorldConfig.class)public class HelloWorldTest { @Autowired HelloWorldMapper mapper; @Test public void testHelloWorld() { mapper.delete(mapper.query() .where.id().eq(1L).end()); HelloWorldEntity entity = new HelloWorldEntity(); entity.setId(1L); entity.setSayHello("hello world"); entity.setYourName("fluent mybatis"); entity.setIsDeleted(false); mapper.insert(entity); HelloWorldEntity result1 = mapper.findOne(mapper.query() .where.id().eq(1L).end()); System.out.println("1. HelloWorldEntity:" + result1.toString()); mapper.updateBy(mapper.updater() .update.sayHello().is("say hello, say hello!") .set.yourName().is("fluent mybatis is powerful!").end() .where.id().eq(1L).end() ); HelloWorldEntity result2 = mapper.findOne(mapper.query() .where.sayHello().like("hello") .and.isDeleted().eq(false).end() .limit(1) ); System.out.println("2. HelloWorldEntity:" + result2.toString()); }}执行Junit4测试方法,控制台输出
HelloWorldEntity:HelloWorldEntity{id=1, sayHello='hello world', yourName='fluent mybatis', gmtCreate=null, gmtModified=null, isDeleted=false}
2. HelloWorldEntity:HelloWorldEntity{id=1, sayHello='say hello, say hello!', yourName='fluent mybatis is powerful!', gmtCreate=null, gmtModified=null, isDeleted=false}
神奇吧! 我们再到数据库中查看一下结果

现在,我们已经通过一个简单例子演示了fluent mybatis的强大功能,
在进一步介绍fluent mybatis更强大功能前,我们揭示一下为啥我们只写了一个数据表对应的Entity类,
却拥有了一系列增删改查的数据库操作方法。
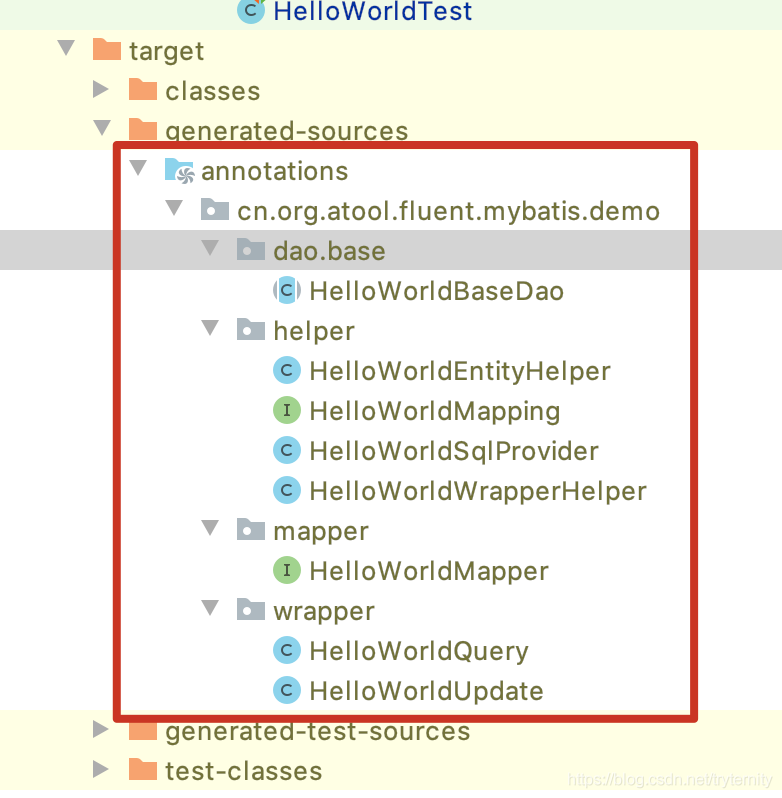
fluent mybatis根据Entity类上@FluentMybatis注解在编译时,
会在target目录class目录下自动编译生成一系列文件:

核心接口类, 使用时需要了解
mapper/*Mapper: mybatis的Mapper定义接口, 定义了一系列通用的数据操作接口方法。
dao/*BaseDao: Dao实现基类, 所有的DaoImpl都继承各自基类
根据分层编码的原则,我们不会在Service类中直接使用Mapper类,而是引用Dao类。我们在Dao实现类中根据条件实现具体的数据操作方法。
wrapper/*Query: fluent mybatis核心类, 用来进行动态sql的构造, 进行条件查询。
wrapper/*Updater: fluent mybatis核心类, 用来动态构造update语句。
entity/*EntityHelper: Entity帮助类, 实现了Entity和Map的转换方法
辅助实现时, 实现fluent mybatis动态sql拼装和fluent api时内部用到的类,使用时无需了解
在使用上,我们主要会接触到上述5个生成的java类。Fluent Mybatis为了实现动态拼接和Fluent API功能,还生成了一系列辅助类。
helper/*Mapping: 表字段和Entity属性映射定义类
helper/*SqlProviderP: Mapper接口动态sql提供者
helper/*WrapperHelper: Query和Updater具体功能实现, 包含几个实现:select, where, group by, having by, order by, limit
感谢各位的阅读,以上就是“FluentMybatis怎么实现mybatis动态sql拼装和fluent api语法”的内容了,经过本文的学习后,相信大家对FluentMybatis怎么实现mybatis动态sql拼装和fluent api语法这一问题有了更深刻的体会,具体使用情况还需要大家实践验证。这里是编程网,小编将为大家推送更多相关知识点的文章,欢迎关注!
免责声明:
① 本站未注明“稿件来源”的信息均来自网络整理。其文字、图片和音视频稿件的所属权归原作者所有。本站收集整理出于非商业性的教育和科研之目的,并不意味着本站赞同其观点或证实其内容的真实性。仅作为临时的测试数据,供内部测试之用。本站并未授权任何人以任何方式主动获取本站任何信息。
② 本站未注明“稿件来源”的临时测试数据将在测试完成后最终做删除处理。有问题或投稿请发送至: 邮箱/279061341@qq.com QQ/279061341


