OpenStack云平台Train版搭建与基础环境准备的方法是什么
这篇文章主要介绍了OpenStack云平台Train版搭建与基础环境准备的方法是什么的相关知识,内容详细易懂,操作简单快捷,具有一定借鉴价值,相信大家阅读完这篇OpenStack云平台Train版搭建与基础环境准备的方法是什么文章都会有所收获,下面我们一起来看看吧。
OpenStack简介
OpenStack是由美国国家航空航天局NASA)与Rackspace公司合作研发并发起的,以Apache许可证授权的自由软件和开放源代码的云计算技术解决方案,其是一个项目也是一个软件,主要用于实现云项目,以云项目操作系统而存在。作用: 用于部署公有云、私有云,并实现对云项目管理。
开发语言: Python
一、环境准备
| 名称 | IP地址 | 主机名称 | 备注 |
| 控制节点 | 192.168.124.88 | controller | 最小4G,开启虚拟化 |
| 计算节点 | 192.168.124.89 | computel | 最小2G,开启虚拟化 |
1.1、关闭selinxu
[root@localhost ~]# setenforce 0[root@localhost ~]# vi /etc/selinux/config [root@localhost ~]# sed -i 's/SELINUX=enforcing/SELINUX=disabled/g' /etc/selinux/config1.2、关闭防火墙
[root@localhost ~]# systemctl stop firewalld[root@localhost ~]# systemctl disable firewalldRemoved symlink /etc/systemd/system/multi-user.target.wants/firewalld.service.Removed symlink /etc/systemd/system/dbus-org.fedoraproject.FirewallD1.service.1.3、修改主机名
[root@localhost ~]# hostnamectl set-hostname controller[root@localhost ~]# hostnamectl set-hostname computer1.4、配置时间同步服务器
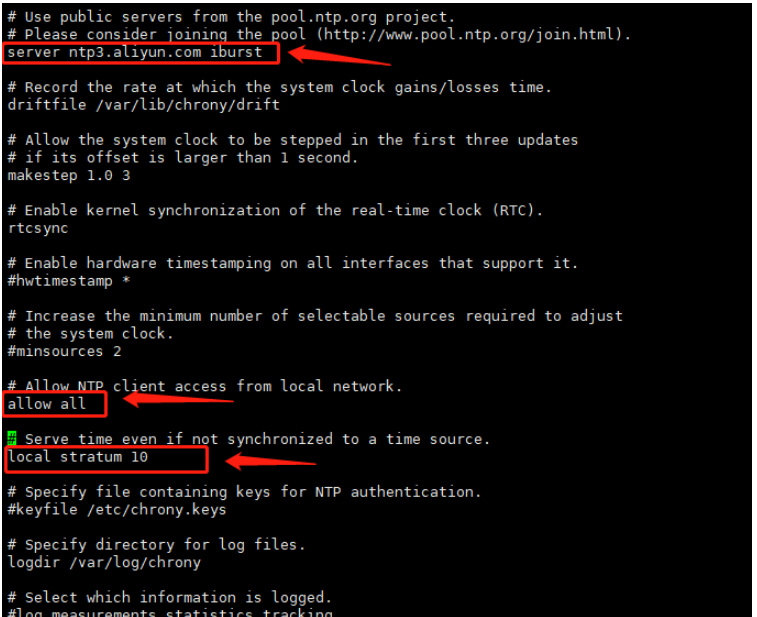
[root@computer ~]# yum install -y chrony[root@controller ~]# yum install -y chronycontroller修改时间同步服务器配置:
[root@controller ~]# vi /etc/chrony.conf
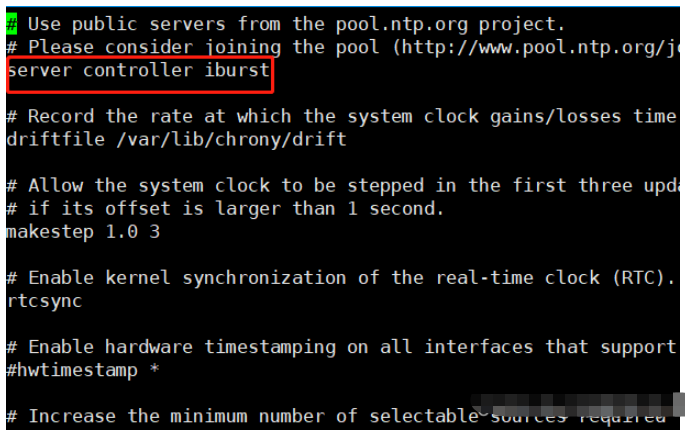
computer修改时间同步服务器配置:
[root@computer ~]# vi /etc/chrony.conf
两个节点都重启时间同步服务器
[root@controller ~]# systemctl restart chronyd查看一下已经同步好了
[root@controller ~]# chronyc sources210 Number of sources = 1MS Name/IP address Stratum Poll Reach LastRx Last sample ===============================================================================^* 203.107.6.88 2 6 17 50 +2663us[+4287us] +/- 30ms[root@controller ~]# date Tue Feb 7 10:06:43 EST 20231.5、配置域名
[root@controller ~]# vi /etc/hosts[root@computer ~]# vi /etc/hosts
二、安装OpenStack库
2.1、启用OpenStack仓库的包
[root@controller ~]# yum install centos-release-openstack-train -y[root@computer ~]# yum install centos-release-openstack-train -y2.2、安装python-openstackclient
先安装源
[root@controller ~]# yum install python-openstackclient -y[root@computer ~]# yum install centos-release-openstack-train -y继续安装
[root@controller ~]# yum install openstack-selinux -y[root@computer ~]# yum install openstack-selinux -y2.3、controller安装数据库
[root@controller ~]# yum install mariadb mariadb-server python2-PyMySQL -y创建配置并修改IP
[root@controller ~]# vi /etc/my.cnf.d/openstack.cnf[mysqld]bind-address = 192.168.124.88 default-storage-engine = innodbinnodb_file_per_table = onmax_connections = 4096collation-server = utf8_general_cicharacter-set-server = utf8~重启数据库
[root@controller ~]# systemctl enable mariadb.service[root@controller ~]# systemctl start mariadb.service初始化数据库
[root@controller ~]# mysql_secure_installation NOTE: RUNNING ALL PARTS OF THIS SCRIPT IS RECOMMENDED FOR ALL MariaDB SERVERS IN PRODUCTION USE! PLEASE READ EACH STEP CAREFULLY! In order to log into MariaDB to secure it, we'll need the currentpassword for the root user. If you've just installed MariaDB, andyou haven't set the root password yet, the password will be blank,so you should just press enter here. Enter current password for root (enter for none): OK, successfully used password, moving on... Setting the root password ensures that nobody can log into the MariaDBroot user without the proper authorisation. Set root password? [Y/n] yNew password: Re-enter new password: Password updated successfully!Reloading privilege tables.. ... Success! By default, a MariaDB installation has an anonymous user, allowing anyoneto log into MariaDB without having to have a user account created forthem. This is intended only for testing, and to make the installationgo a bit smoother. You should remove them before moving into aproduction environment. Remove anonymous users? [Y/n] y ... Success! Normally, root should only be allowed to connect from 'localhost'. Thisensures that someone cannot guess at the root password from the network. Disallow root login remotely? [Y/n] n ... skipping. By default, MariaDB comes with a database named 'test' that anyone canaccess. This is also intended only for testing, and should be removedbefore moving into a production environment. Remove test database and access to it? [Y/n] y - Dropping test database... ... Success! - Removing privileges on test database... ... Success! Reloading the privilege tables will ensure that all changes made so farwill take effect immediately. Reload privilege tables now? [Y/n] y ... Success! Cleaning up... All done! If you've completed all of the above steps, your MariaDBinstallation should now be secure. Thanks for using MariaDB!输入密码(这里输入123密码)
2.4、安装消息队列
[root@controller ~]# yum install rabbitmq-server -y重启
[root@controller ~]# systemctl enable rabbitmq-server.service[root@controller ~]# systemctl start rabbitmq-server.service增加用户
[root@controller ~]# rabbitmqctl add_user openstack 123Creating user "openstack"开放权限
[root@controller ~]# rabbitmqctl set_permissions openstack ".*" ".*" ".*"Setting permissions for user "openstack" in vhost "/"#下面引住的不需要做
(这里不需要做)查看消息队列有的服务
[root@controller ~]# rabbitmq-plugins list(这里不需要做)打开这两个服务开启图像化界面
[root@controller ~]# rabbitmq-plugins enable rabbitmq_management rabbitmq_management_agent(这里不需要做)查看端口
[root@controller ~]# ss -tlnState Recv-Q Send-Q Local Address:Port Peer Address:Port LISTEN 0 128 *:25672 *:* LISTEN 0 128 192.168.124.88:3306 *:* LISTEN 0 128 *:4369 *:* LISTEN 0 128 *:22 *:* LISTEN 0 128 *:15672 *:* LISTEN 0 100 127.0.0.1:25 *:* LISTEN 0 128 :::5672 :::* LISTEN 0 128 :::22 :::* LISTEN 0 100 ::1:25 :::*(这里不需要做)通过15672端口可以登录消息队列用户:guest 密码:guest

2.5、配置缓存
[root@controller ~]# yum install memcached python-memcached -y[root@controller ~]# vi /etc/sysconfig/memcached修改配置文件
PORT="11211"USER="memcached"MAXCONN="1024"CACHESIZE="1024"OPTIONS="-l 127.0.0.1,::1,controller"~[root@controller ~]# systemctl enable memcached.service[root@controller ~]# systemctl start memcached.service查看一下配置
[root@controller ~]# cat /etc/sysconfig/memcached PORT="11211"USER="memcached"MAXCONN="1024"CACHESIZE="1024"OPTIONS="-l 127.0.0.1,::1,controller"2.6、配置etcd(这次不用,所以没有装)
下面我们开始安装部署组件,下一篇开始安装Keystone
ldentity 身份认证
代号: Keystone
为OpenStack中其它服务提供身份验证、服务注册、服务令牌等功能。
关于“OpenStack云平台Train版搭建与基础环境准备的方法是什么”这篇文章的内容就介绍到这里,感谢各位的阅读!相信大家对“OpenStack云平台Train版搭建与基础环境准备的方法是什么”知识都有一定的了解,大家如果还想学习更多知识,欢迎关注编程网行业资讯频道。
免责声明:
① 本站未注明“稿件来源”的信息均来自网络整理。其文字、图片和音视频稿件的所属权归原作者所有。本站收集整理出于非商业性的教育和科研之目的,并不意味着本站赞同其观点或证实其内容的真实性。仅作为临时的测试数据,供内部测试之用。本站并未授权任何人以任何方式主动获取本站任何信息。
② 本站未注明“稿件来源”的临时测试数据将在测试完成后最终做删除处理。有问题或投稿请发送至: 邮箱/279061341@qq.com QQ/279061341


